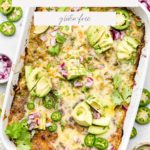
This quick and easy Green Chicken Enchilada Casserole is perfect comfort food. Filled with plenty of chicken, veggies, spices, and melty cheese it’s a delicious and simple way to enjoy enchiladas.

When it comes to comfort food, enchiladas are at the top of my list. Melty cheese, saucy goodness, plenty of tender protein – delicious.
While I love enchiladas, I’m not a huge fan of the whole process of making them. For some reason the idea of having to roll each enchilada always feels like too much work on a weeknight after a busy day. That’s why I am a big fan of this enchilada casserole.
Watch How to Make This Recipe
This layered Green Chile Chicken Enchilada Casserole is all of the best things about enchiladas with half of the work. Instead of rolling, you’ll just make the filling and then layer everything in a casserole dish before topping with cheese and finishing everything off in the oven.
Not only is this enchilada casserole easy, it’s also a recipe that can be customized with whatever veggies you may have on hand and prepped ahead of time. It’s one of those recipes that perfect for a quick weeknight dinner.
Reader Favorite Tex Mex Recipes
Sheet Pan Chipotle Chicken Burrito Bowls
Slow Cooker Beef Enchilada Stuffed Sweet Potatoes
Green Chicken Enchilada Casserole Ingredients
Veggies: the combination of onion, garlic, green chiles, and zucchini build a flavorful base for the chicken filling.
Shredded Chicken: to keep things easy, this recipe uses pre-cooked shredded chicken. I like to use leftover roasted chicken or the meat from a store-bought rotisserie chicken.
Greek Yogurt: plain, full fat Greek yogurt helps to give the filling some delicious creaminess without being too rich.
Green Enchilada Sauce: use your favorite jarred enchilada sauce to keep this recipe nice and easy.
Cheese: a combination of shredded pepper jack and Monterrey cheeses give these recipe just the right amount of flavor and cheesy goodness.
Tortillas: to keep this recipe gluten and grain free, I used these grain free tortillas.
Substitutions and Additions
- Chicken – if you need to make a vegetarian version of this recipe, feel free to replace the shredded chicken with a can or two of black beans instead.
- Sauce – don’t have enchilada sauce on hand? You can replace the enchilada sauce with salsa verde.
- Greek Yogurt – you can swap the plain Greek yogurt for sour cream in the filling if you prefer.
- Cheese – I love the combination of pepper jack and Monterrey cheeses in this recipe, but feel free to use whatever cheese your prefer.
- Tortillas – if you do not need to keep this recipe gluten or grain free, feel free to use your favorite flour tortillas.
- Veggies – this casserole is very forgiving and a great way to use up any extra vegetables you may have in the fridge. Bell peppers, mushrooms, and fresh spinach could all be great additions to the casserole.
Helpful Kitchen Tools to Make This Recipe

How to Make This Green Chicken Enchilada Casserole
Step One: First, start by preheating your oven to 400 degrees and greasing a 9×13 baking dish with oil.
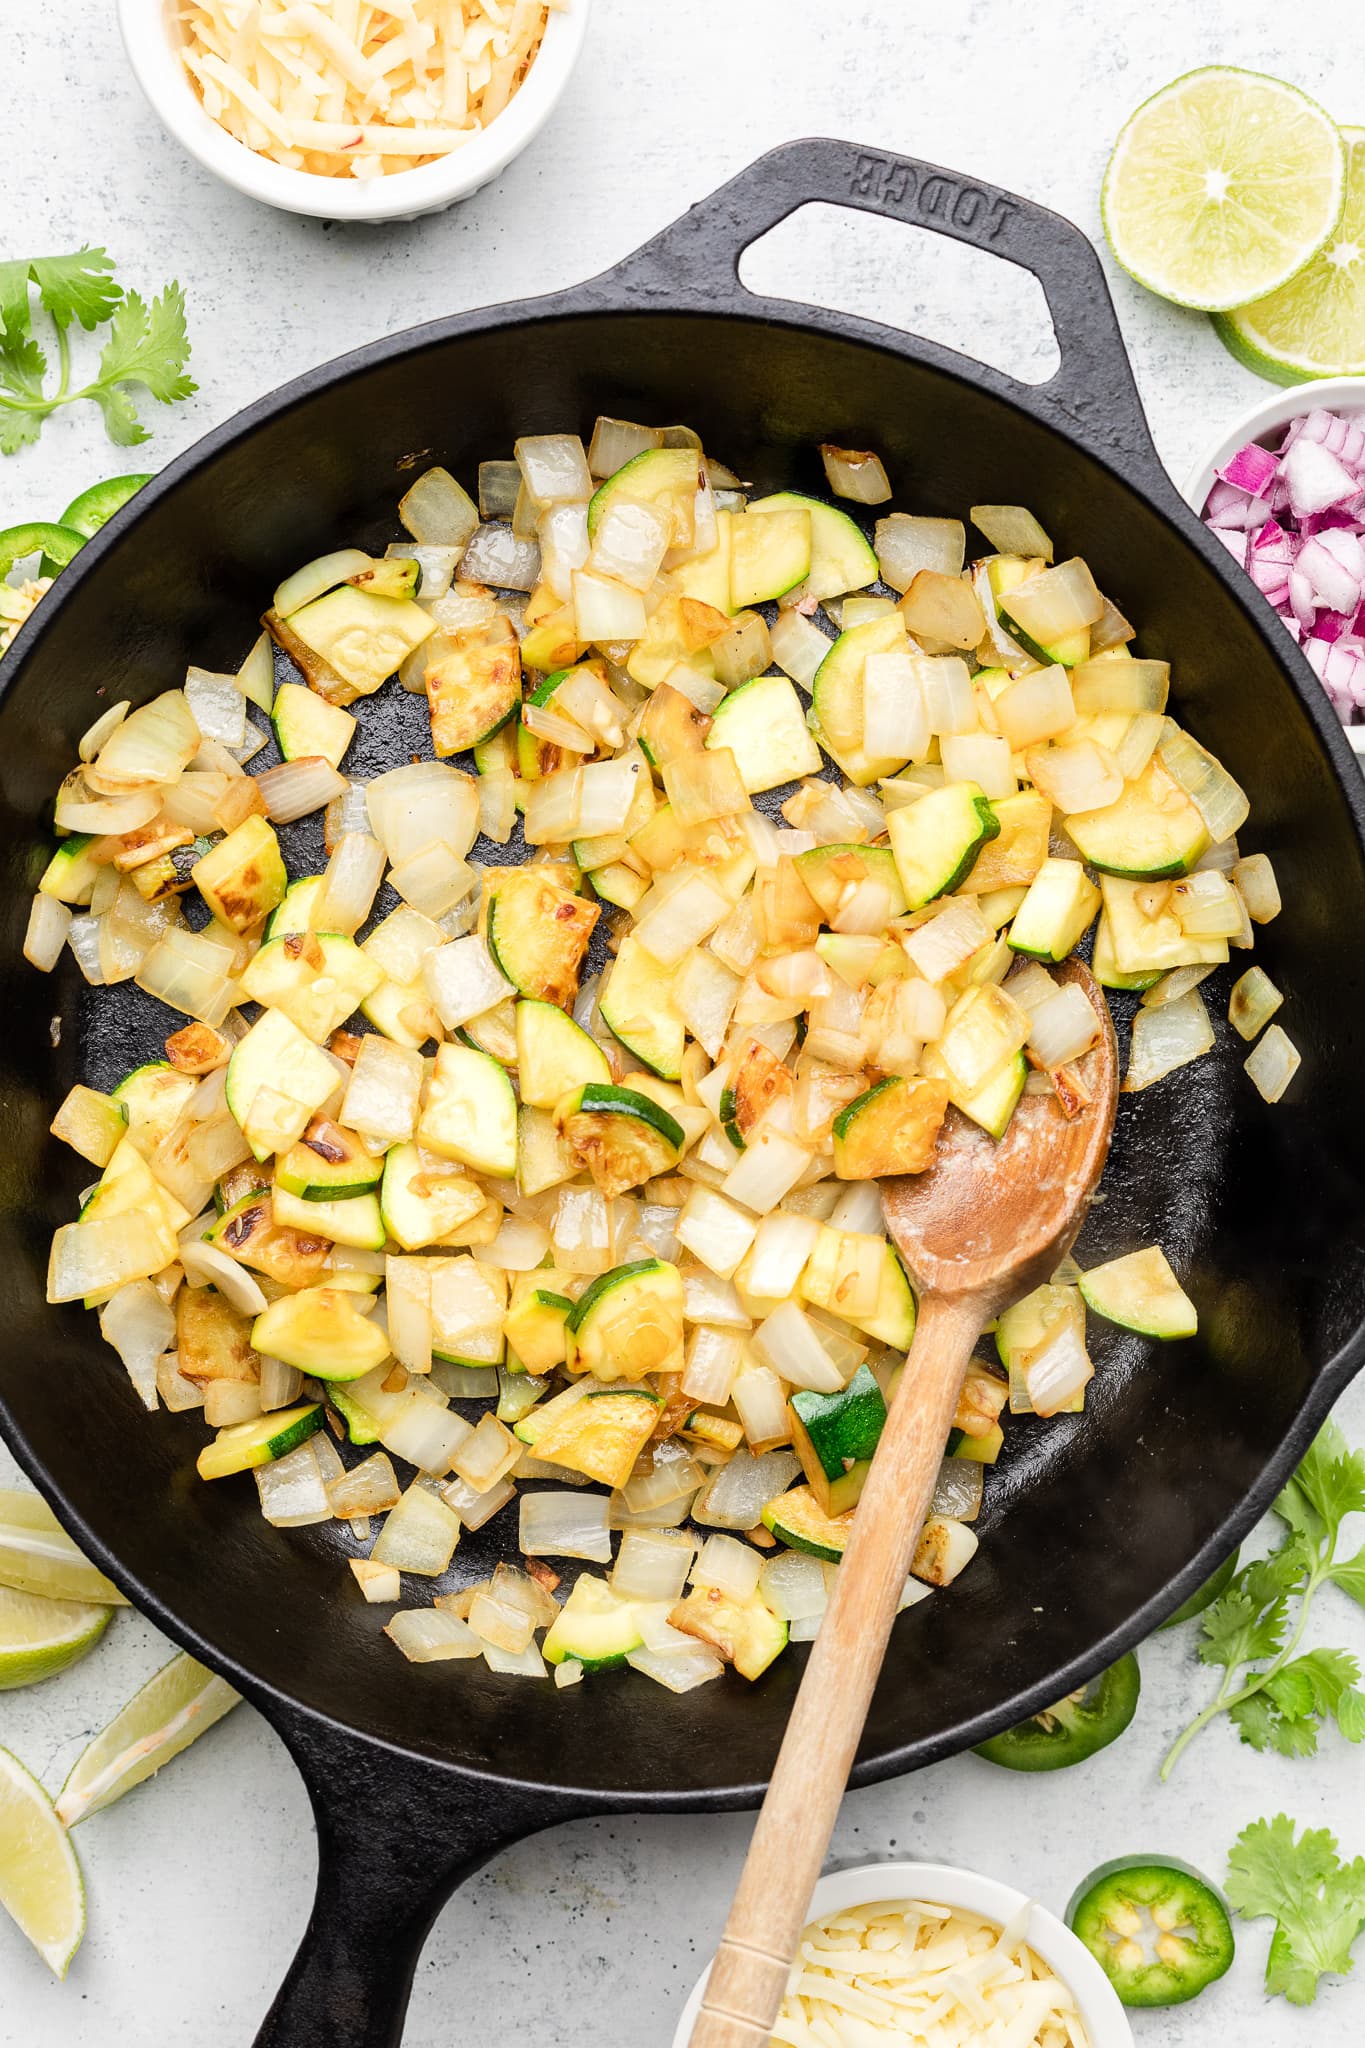
Step Two: Next, heat a large skillet over medium high heat. Once hot, add the avocado oil, diced onion, diced zucchini, and minced garlic to the skillet. Sauté the veggies until tender and then set aside.
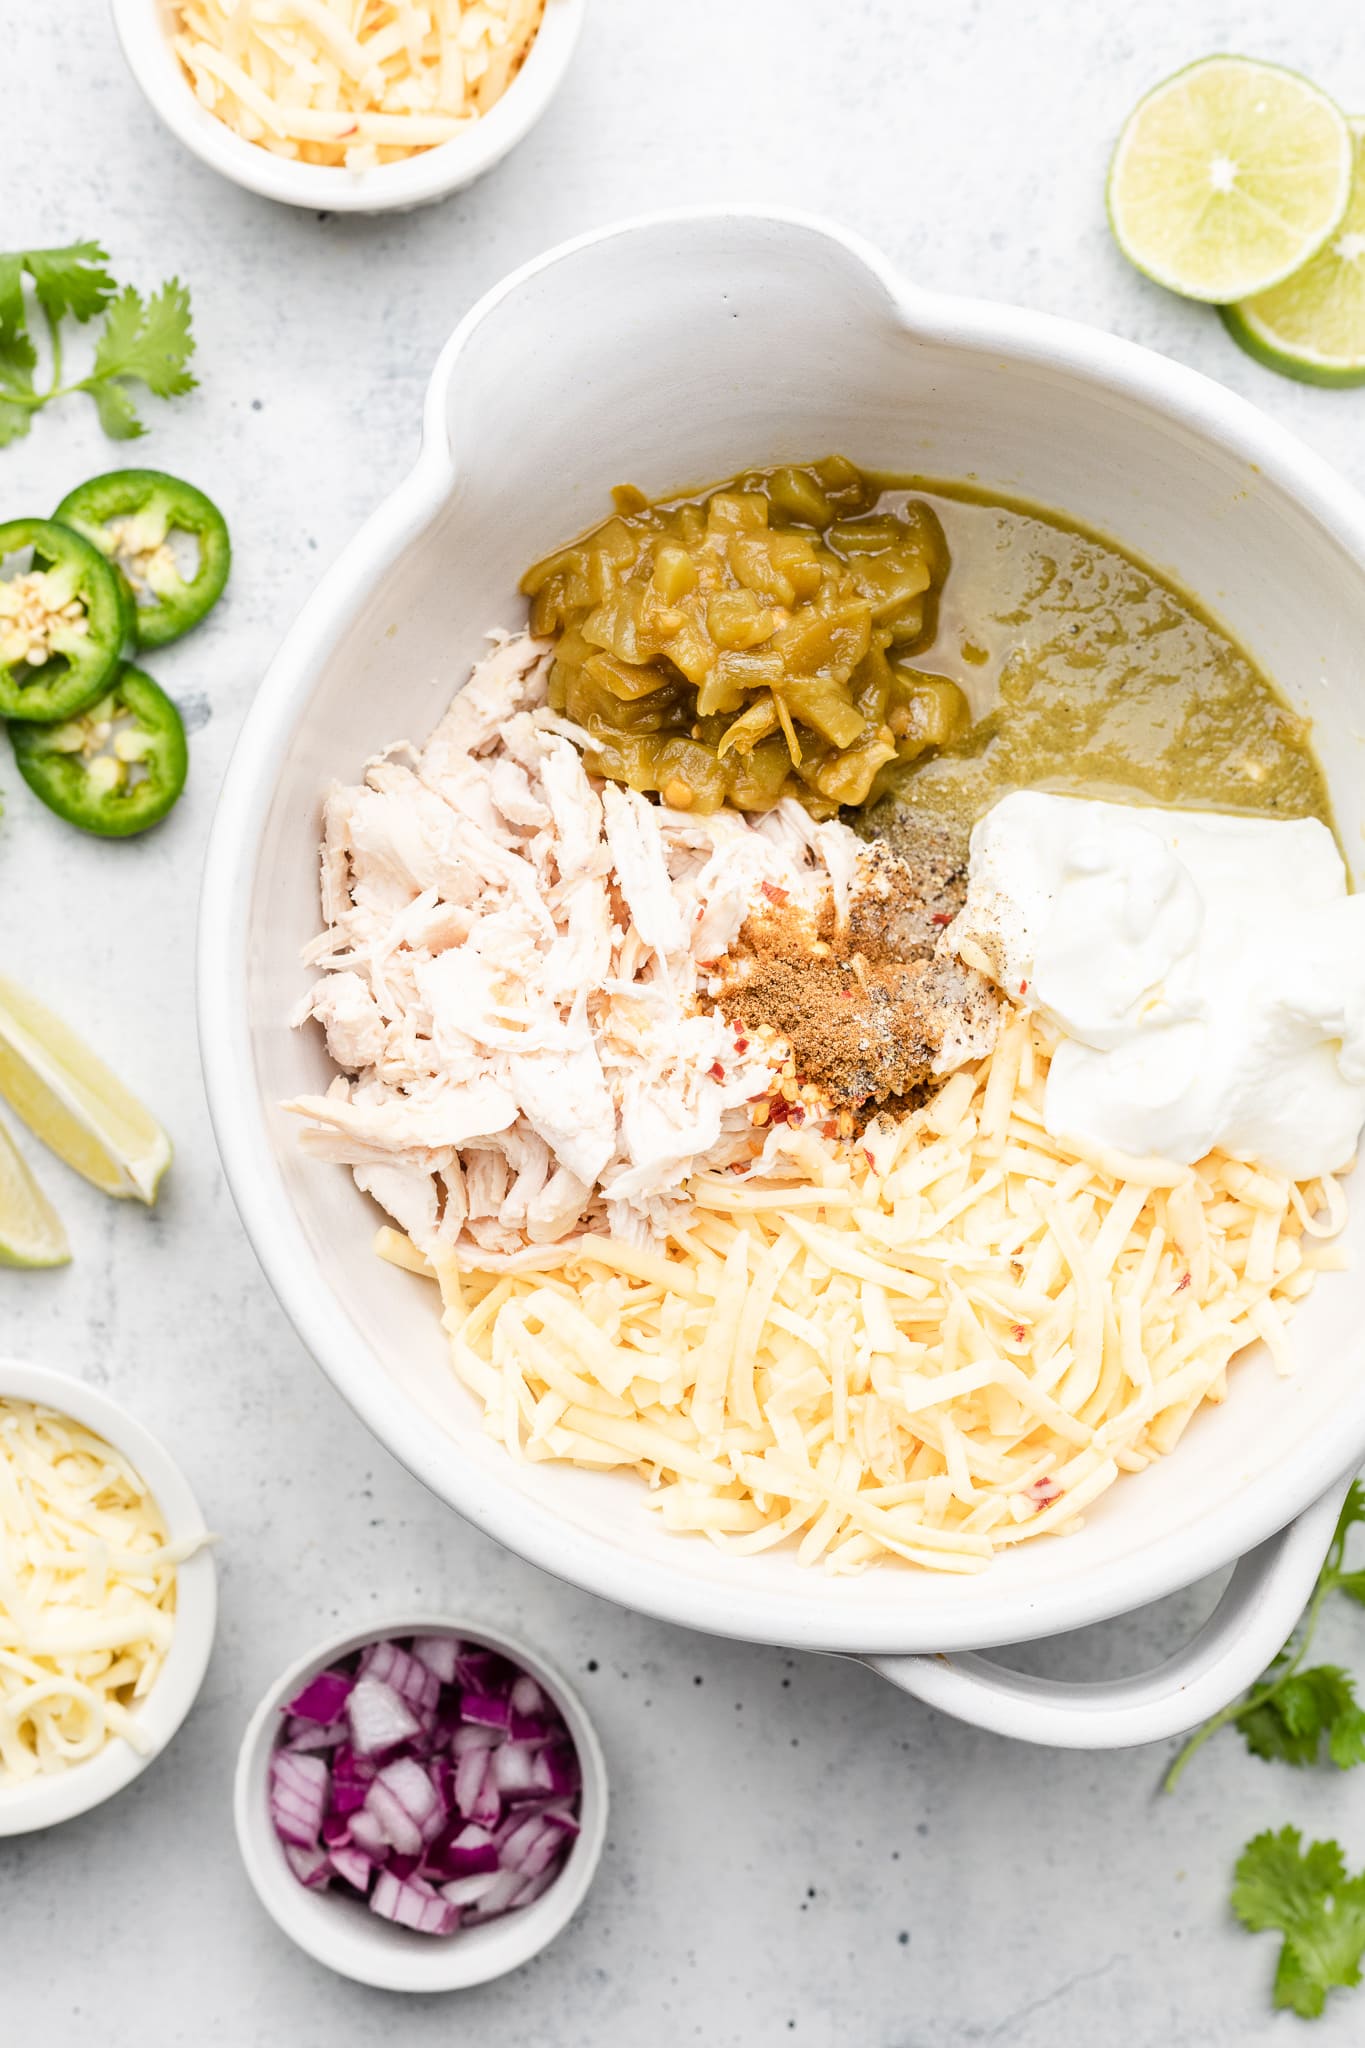
Step Three: Now, it’s time to make the enchilada casserole filling. Add the shredded chicken, Greek yogurt, lime juice, 1 cup of enchilada sauce, four ounces of shredded pepper jack cheese, hatch chiles, ground cumin, crushed red pepper, salt, and pepper to a mixing bowl. Stir until the filling is well combined.
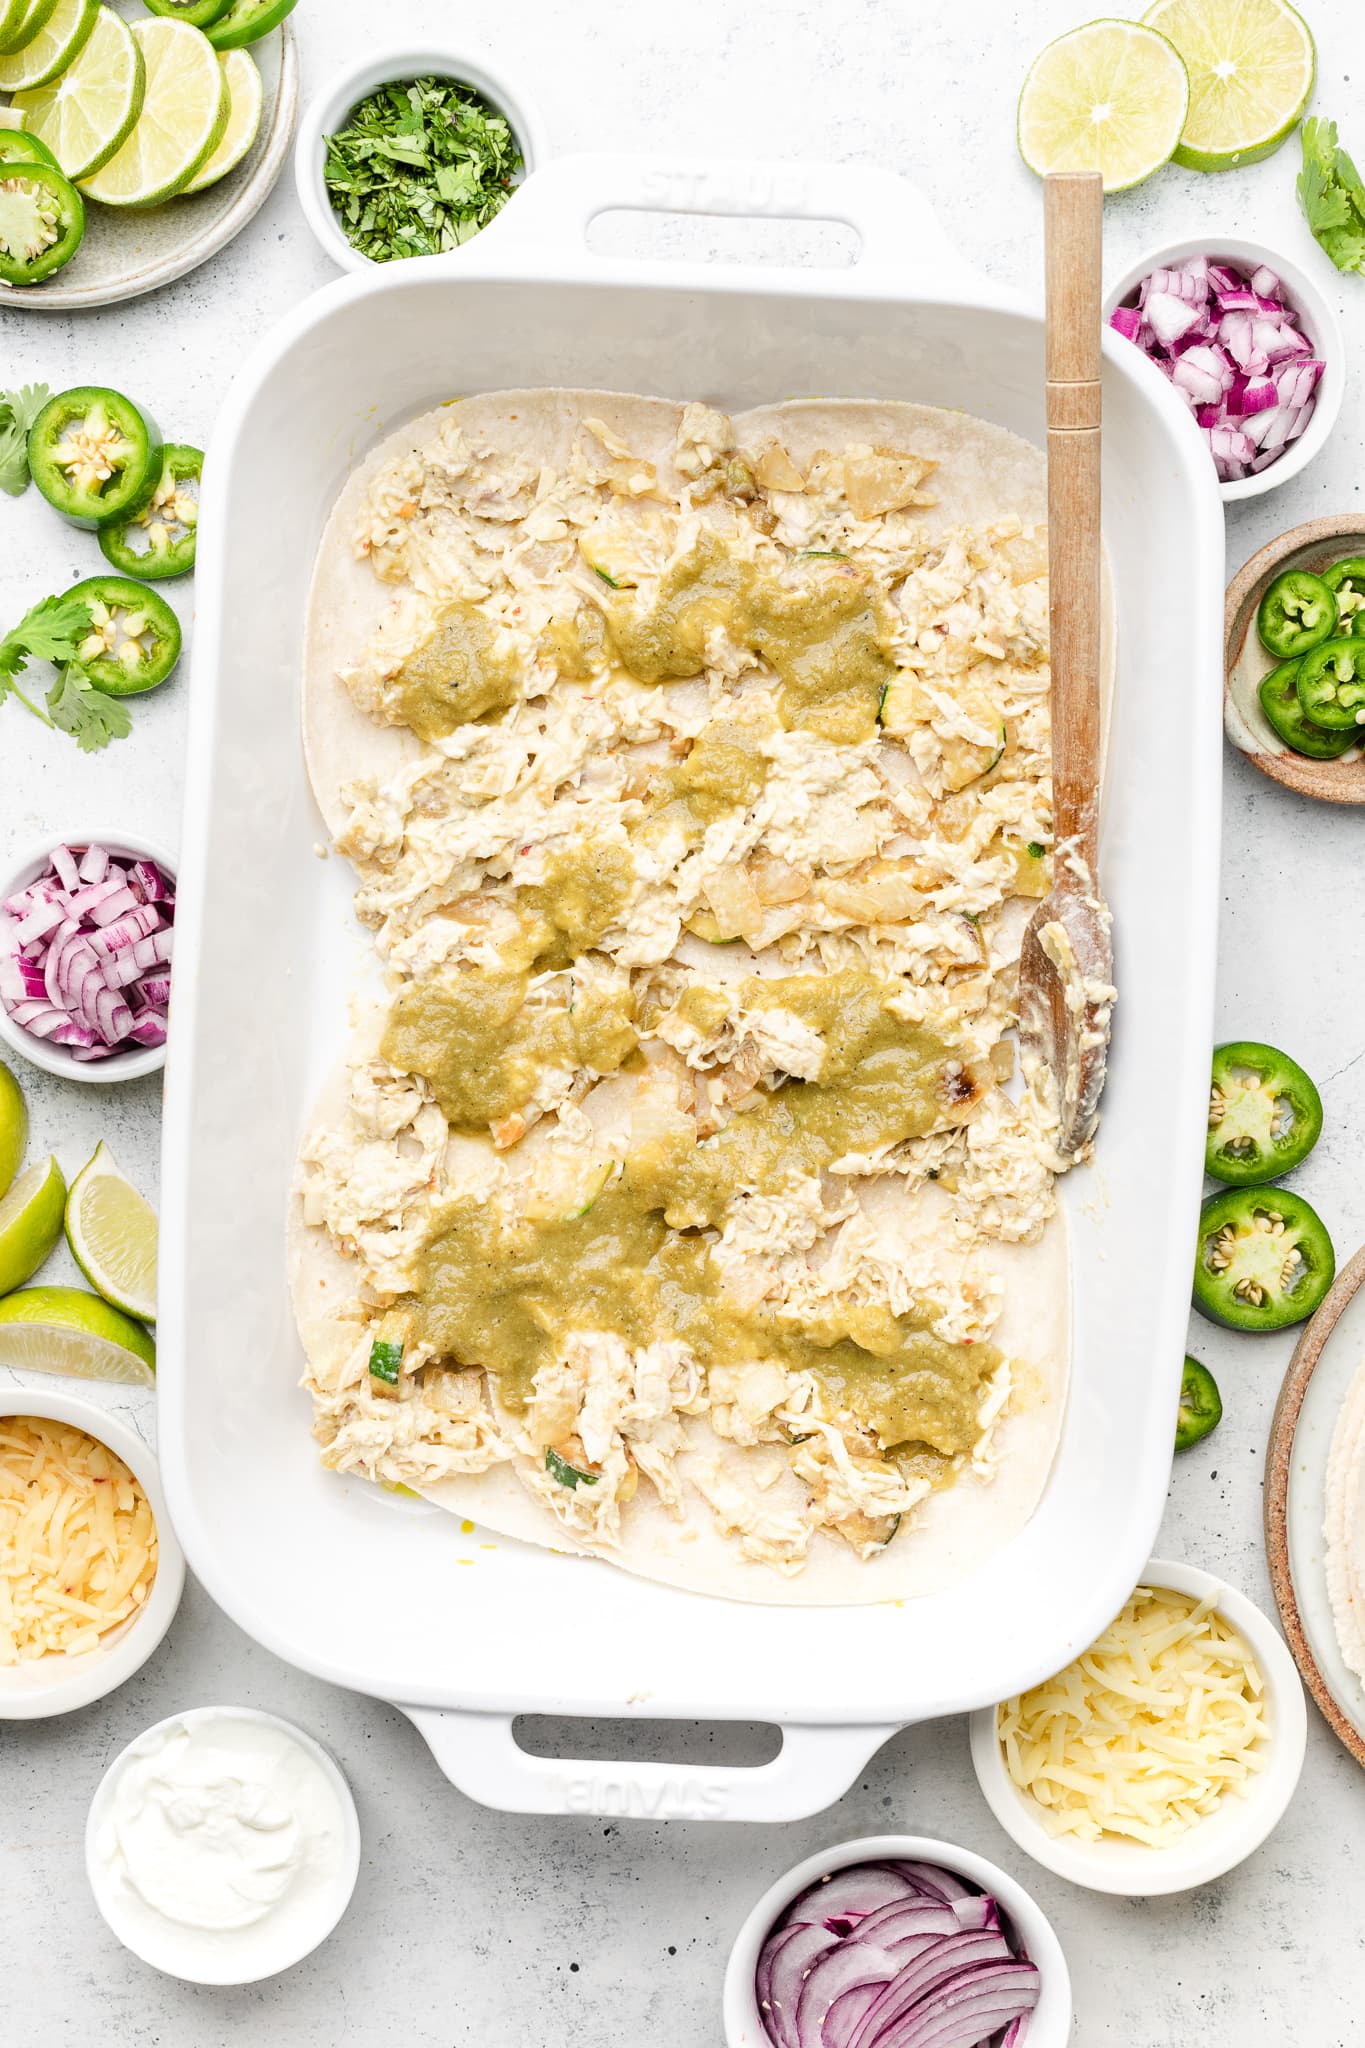
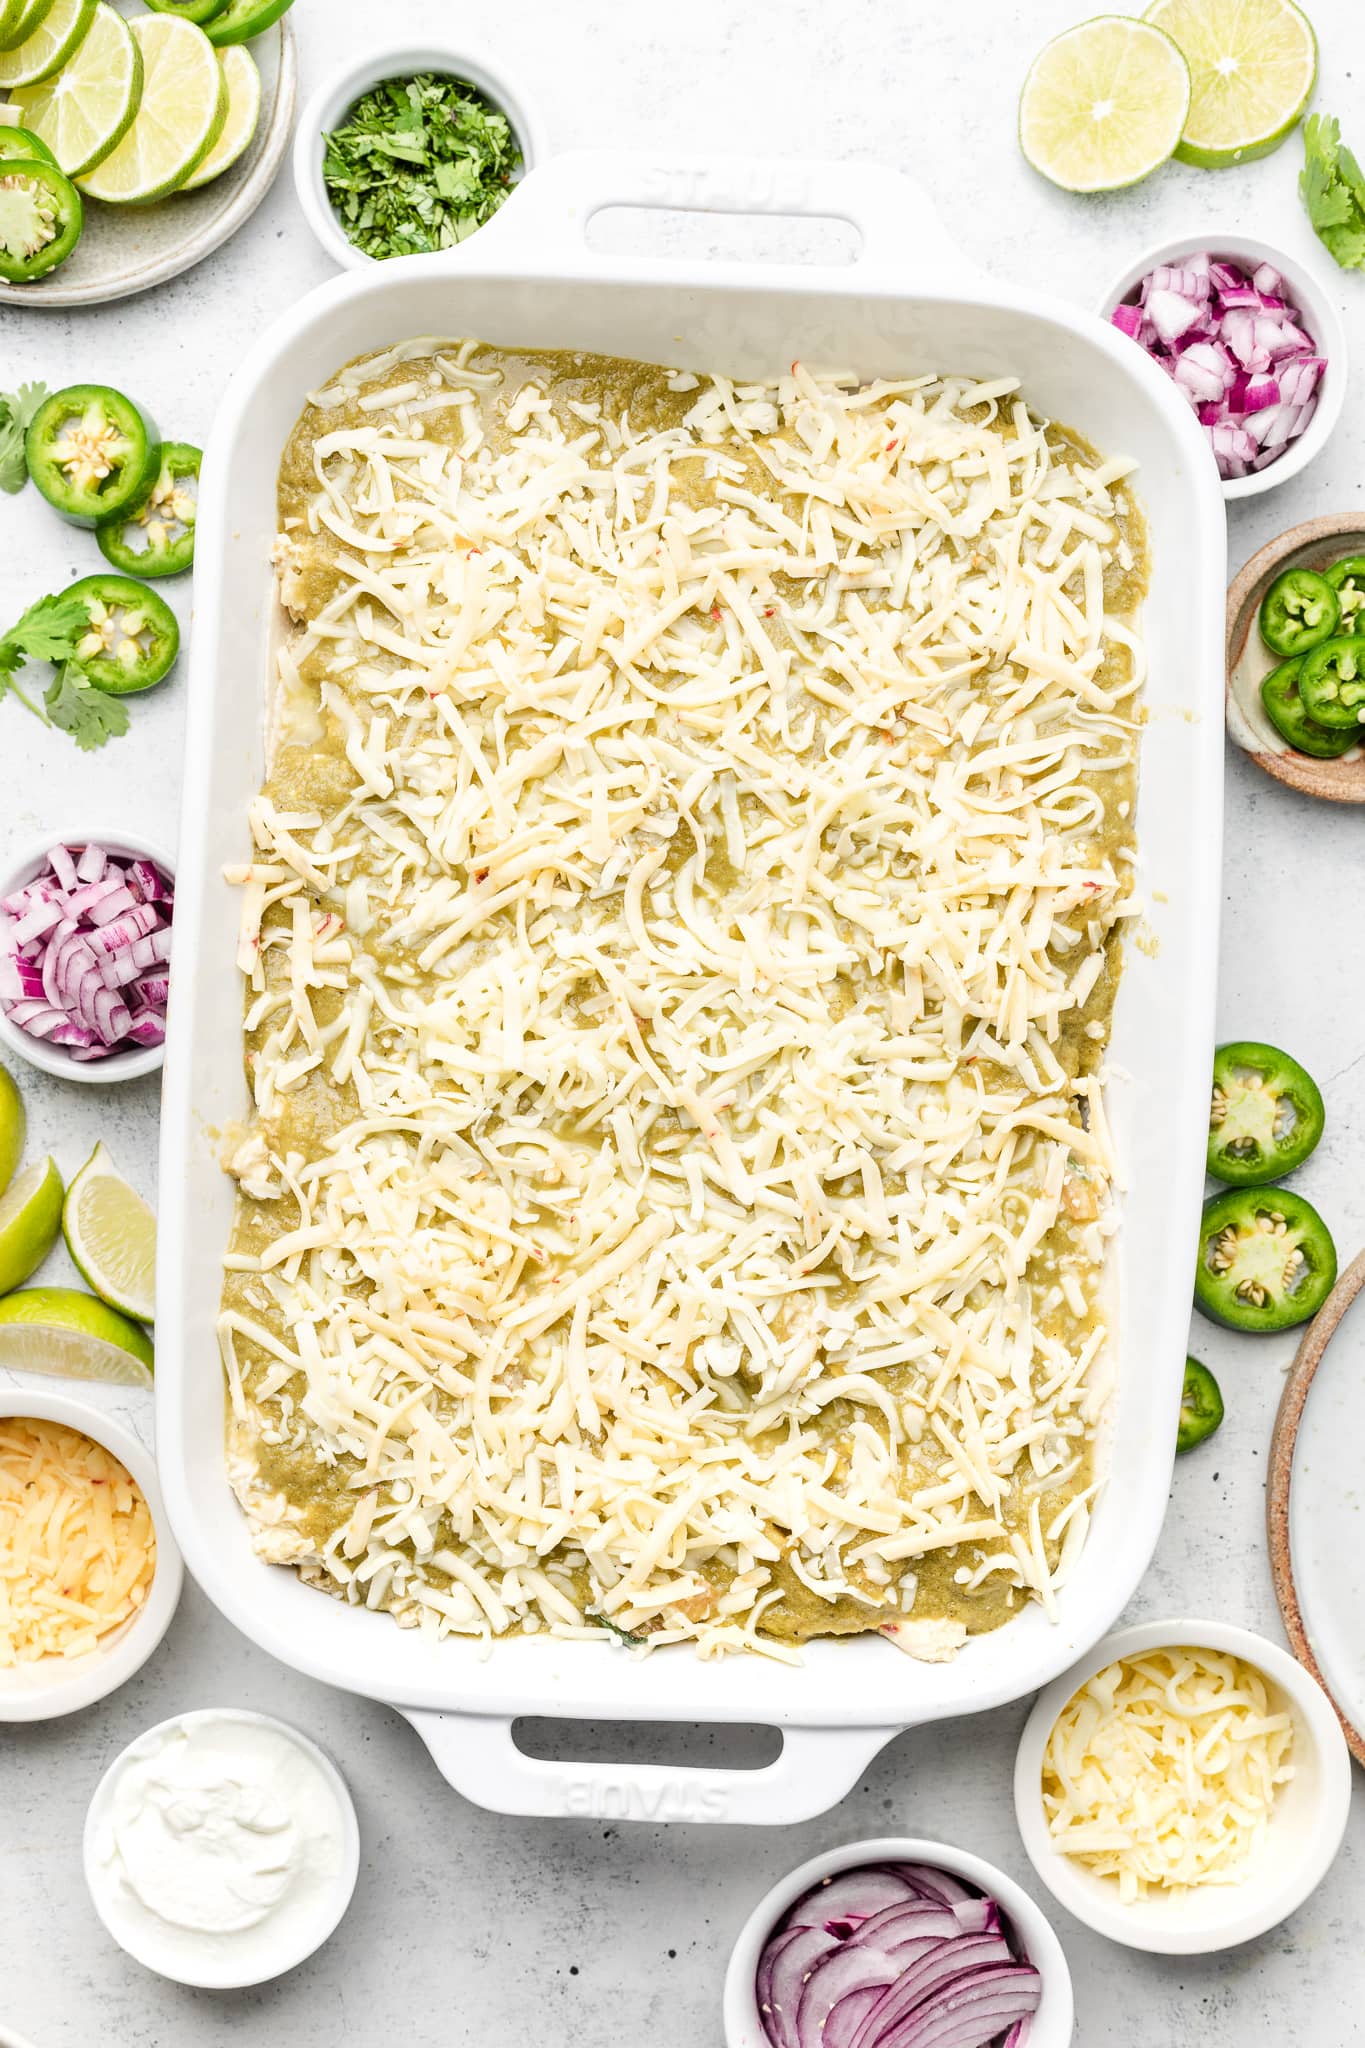
Step Four: Next, assemble the casserole. Start by coating the bottom of your baking dish with a third a cup of enchilada sauce. Next, place a layer of 4 tortillas in the casserole dish. The will naturally overlap a bit and that is perfectly fine. Next, add approximately a heaping cup of the chicken filling and spread it out with a spatula or the back of spoon. Then pour on another third of a cup of enchilada sauce. Repeat the process until all of the tortillas are used. You will end with three layers with the chicken filling on top.
Step Five: Pour the remaining enchilada sauce over the casserole and then sprinkle with an even layer of the remaining shredded pepper jack and monterrey cheeses.
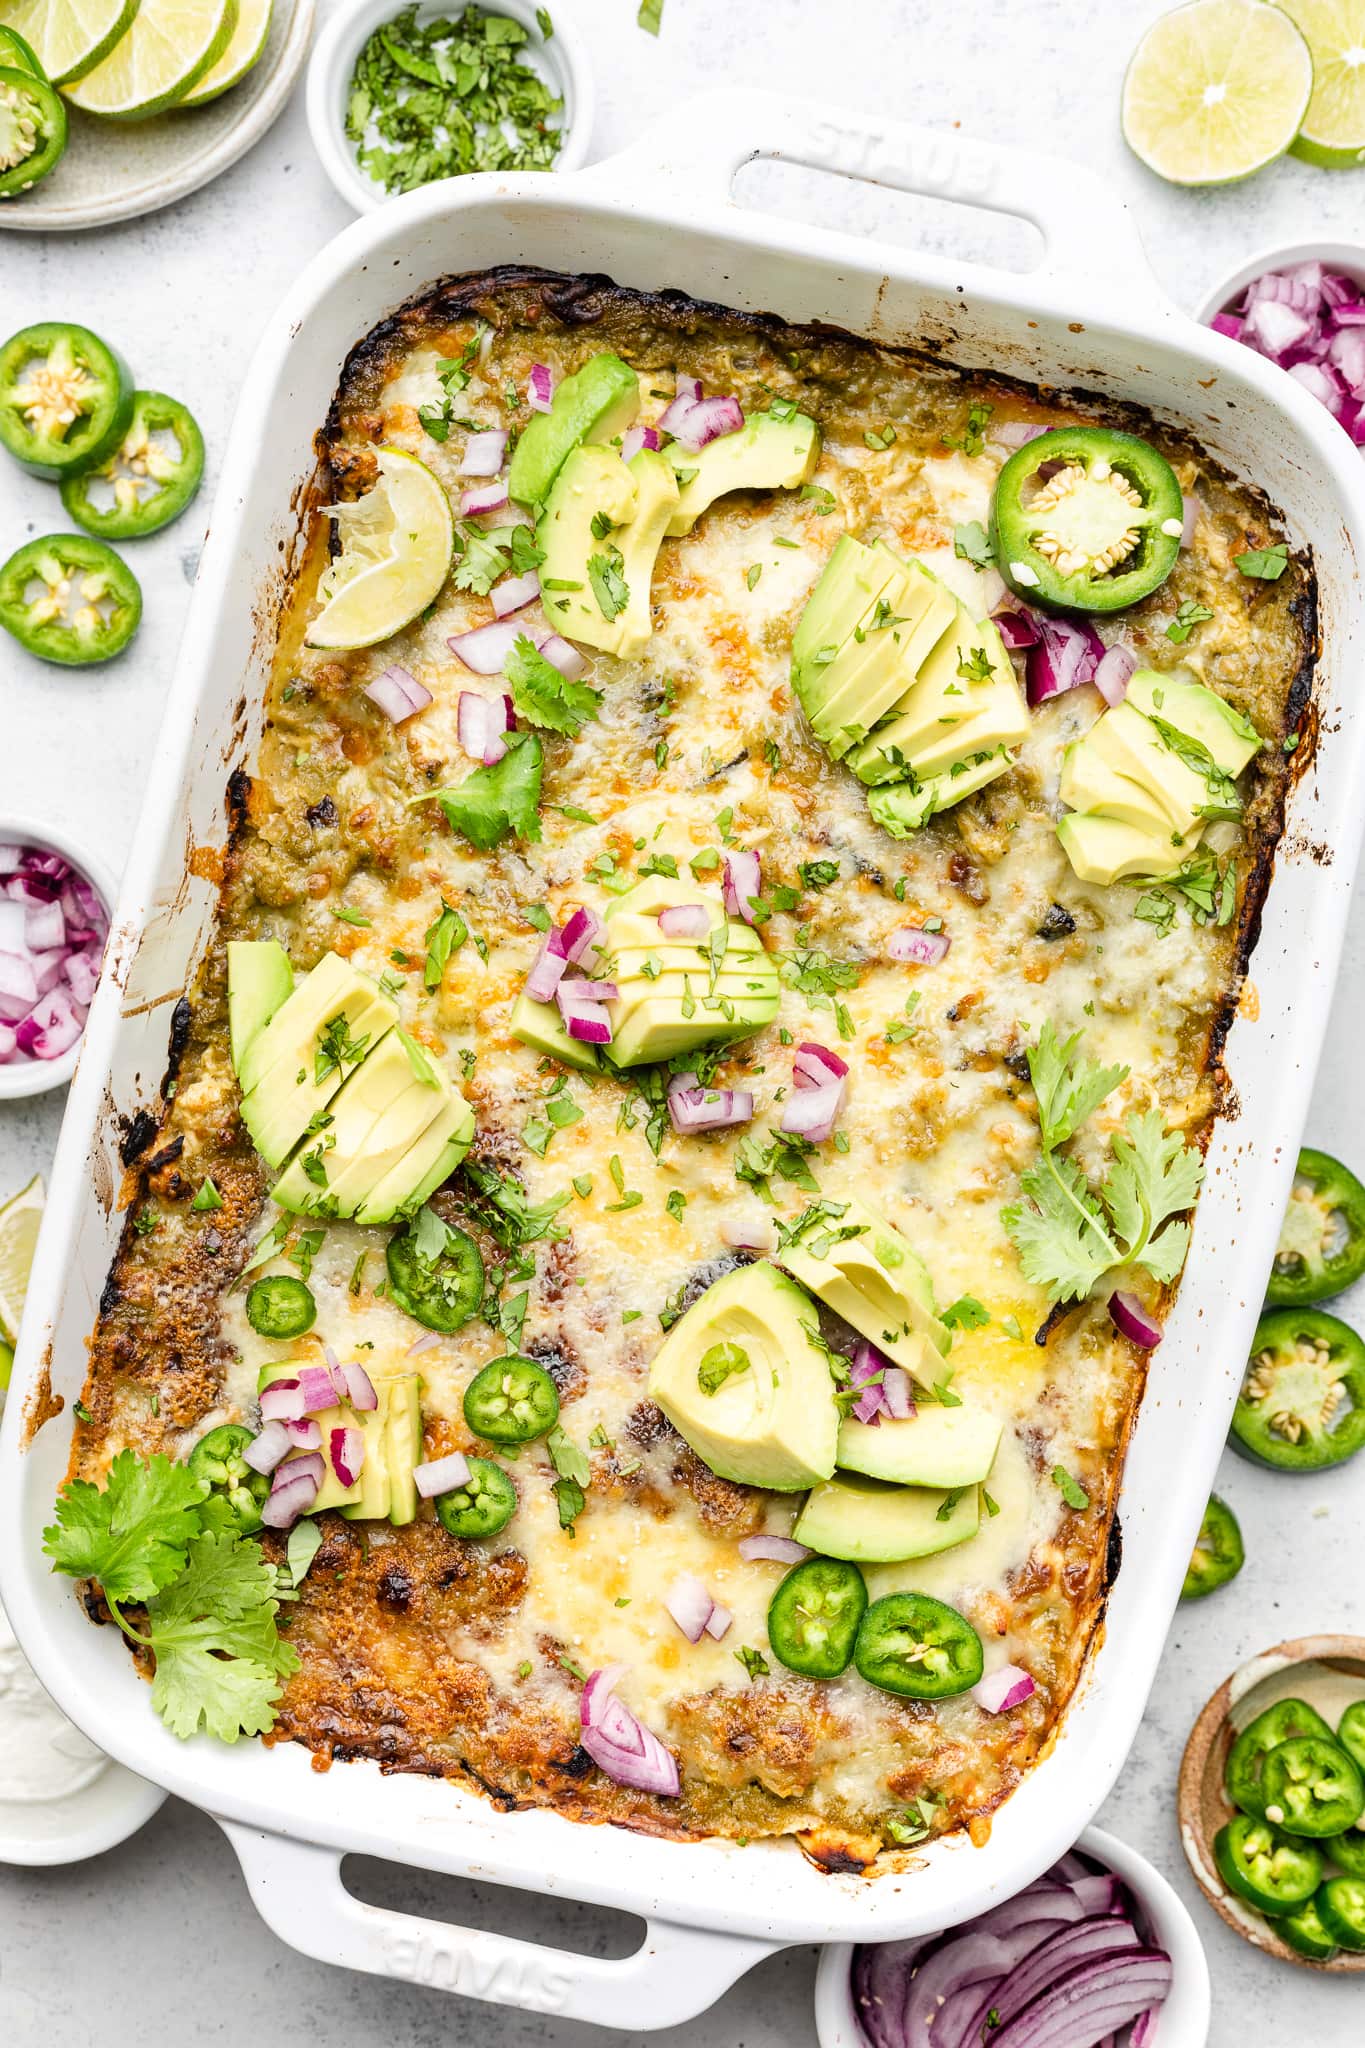
Step Six: Bake the casserole for around twenty minutes until it is melty, bubbly, and beginning to brown on the top. Let the casserole rest for a few minutes before serving.
Step Seven: Garnish the casserole with all your favorite toppings and enjoy!
Tips and Tricks
- For the best results, I highly recommend shredding your own cheese instead of buying a pre-shredded bag of cheese. Pre-shredded cheese contains stabilizers and don’t melt as nicely as blocks of cheese that are hand shredded. To make things easier and save time, you can use a food processor to grate your own cheese.
- Be sure to let the casserole rest for a few minutes before serving. This will ensure that it holds together a bit better when slicing.
- If you want your casserole to be a bit more brown on top, feel free to place it under the broiler for a bit.
- Want your casserole a bit more saucy? Feel free to use a bit more enchilada sauce.
Can I Prep This Casserole in Advance?
Yes! If you like you can prepare this casserole up to a day in advance. Just assemble everything and then cover tightly with foil before placing in the fridge.
When you are ready to bake the casserole, remove it from the fridge and place on the counter for 20 minutes and allow it to come to room temperature before baking.
How to Store
You can store any leftover casserole, tightly covered, in the fridge for up to three to four days.
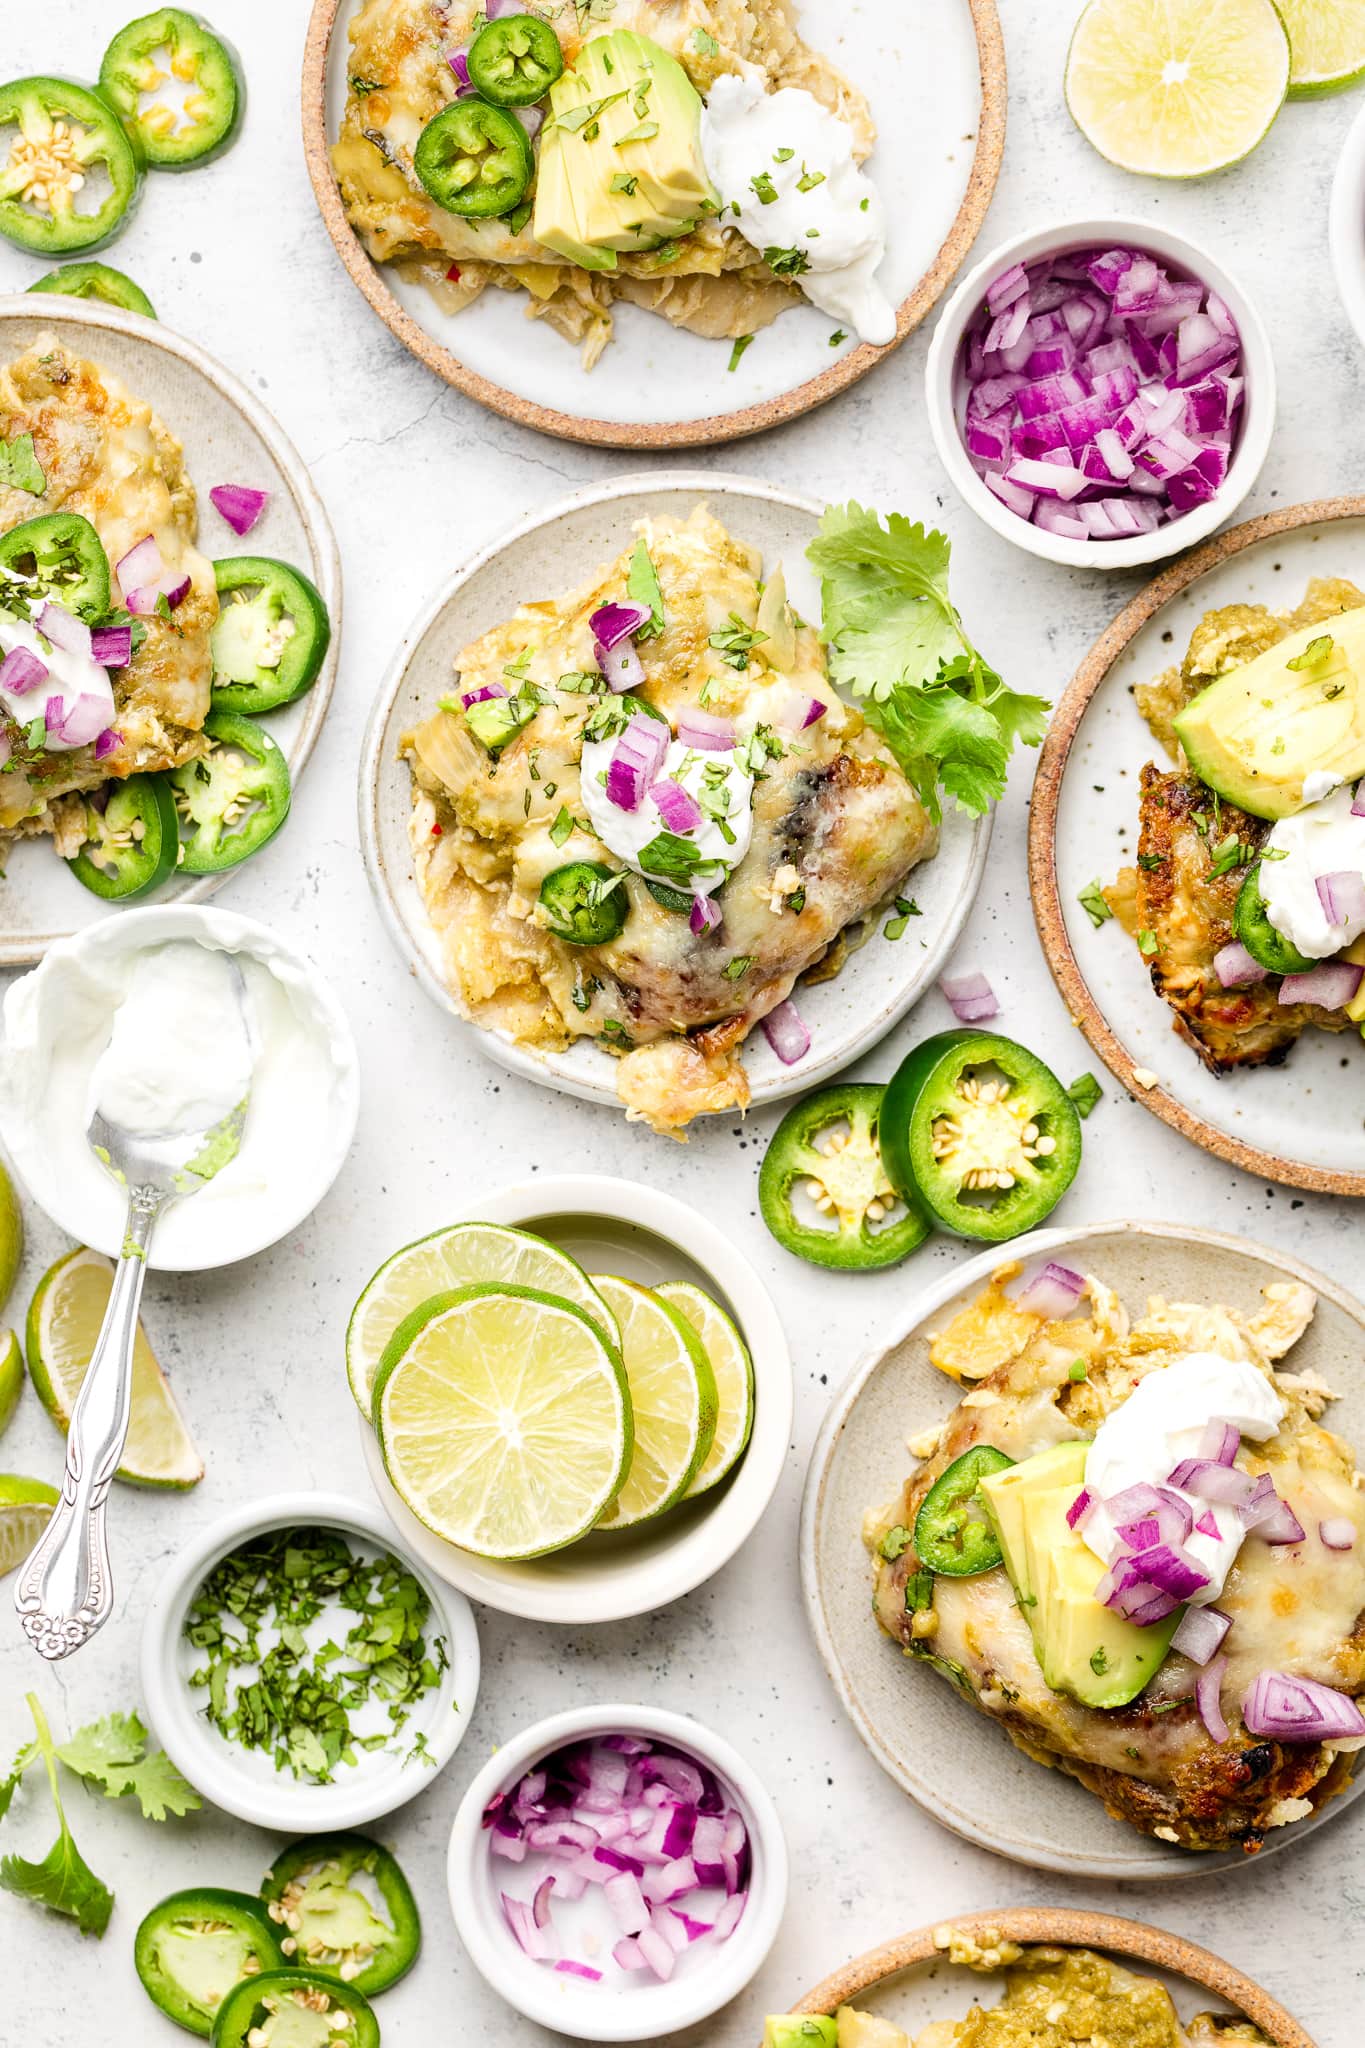
Favorite Toppings
There are so many ways you can top these enchiladas and they are all delicious.
Here are a few of my favorite topping ideas:
- sliced avocado
- chopped cilantro
- salsa verde or your favorite salsa of choice
- diced red onion
- fresh limes
- sliced jalapeno peppers
Delicious Dishes to Serve on the Side
Herbed Brown Butter Cheddar Cornbread
Delicious Mexican Street Corn Salad
Fried Plantains with Cinnamon and Sea Salt

I hope you give this Green Chicken Enchilada Casserole a try! It’s hearty, delicious, and perfect comfort food.
If you do give this recipe a try, I want to know! Leave a comment with a star rating below. You can also snap a photo & tag @allthehealthythings on INSTAGRAM. Your reviews help support All the Healthy Things and make it possible for me to continue to create the recipes you know and love.
Print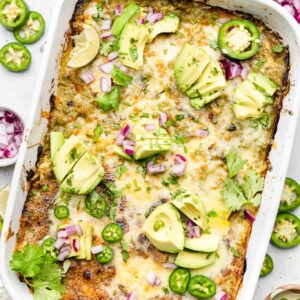
Green Chicken Enchilada Casserole
- Prep Time: 15 minutes
- Cook Time: 25 minutes
- Total Time: 40 minutes
- Yield: 6 1x
- Category: Dinner
- Method: Stovetop & Baking
- Cuisine: American
- Diet: Gluten Free
- Prep Time: 15 minutes
- Cook Time: 25 minutes
- Total Time: 40 minutes
- Yield: 6 1x
- Category: Dinner
- Method: Stovetop & Baking
- Cuisine: American
- Diet: Gluten Free
Ingredients
- 1/2 tablespoon avocado oil
- 1 small yellow onion, diced
- 1 zucchini, small diced
- 4 cloves garlic, finely minced
- 4 cups shredded chicken breast (I used the meat from a rotisserie chicken)
- 1/2 cup plain whole milk Greek yogurt
- 1/4 cup lime juice
- 32 oz green enchilada sauce, divided
- 6 oz shredded pepper jack cheese, divided
- 4 oz hatch chiles
- 1 teaspoon ground cumin
- 1/4 teaspoon crushed red pepper flake
- salt and pepper, to taste
- 12 grain free tortillas (I used Siete)
- 4 oz monterrey cheese
- For serving and garnish: lime wedges, cilantro, sour cream/Greek yogurt, avocado, diced red onion, slice jalapeño
Method
- Preheat oven to 400 degrees and grease a 9×13 baking dish with oil.
- Heat a large skillet over medium high heat. Once hot, add the avocado oil, diced onion, diced zucchini, and minced garlic. Sauté the garlic, onion, and zucchini in avocado oil until tender. Set aside.
- Make the Filling: Add the sautéed veggies, shredded chicken, Greek yogurt, lime juice, 1 cup of enchilada sauce, 4 oz shredded pepper jack cheese, hatch chiles, ground cumin, crushed red pepper, salt, and pepper to a mixing bowl. Stir until everything is well combined.
- Assemble the Casserole: Coat the bottom of the 9×13 baking dish with 1/3 cup of enchilada sauce. Then place a layer of 4 tortillas in the dish (they will overlap some). Next, add approximately a heaping cup of the chicken filling and spread out with a spatula or the back of spoon. Then pour on 1/3 cup of enchilada sauce. Repeat the process until all of the tortillas are used, you will have 3 layers ending with chicken filling on top.
- Pour the remaining enchilada sauce over the casserole and then sprinkle with an even layer of the remaining 2 oz of shredded pepper jack and 4 oz Monterrey cheese over the casserole.
- Bake at 400 degrees for 20-25 minutes until cheese is melty, bubbly, and beginning to brown.
- Garnish the enchilada casserole with chopped cilantro, diced red onion, sliced avocado, sliced jalapeño, sour cream or Greek yogurt, and fresh limes.
Recipe by: Ashlea Carver / All the Healthy Things | Photography by: THE MINDFUL HAPA


