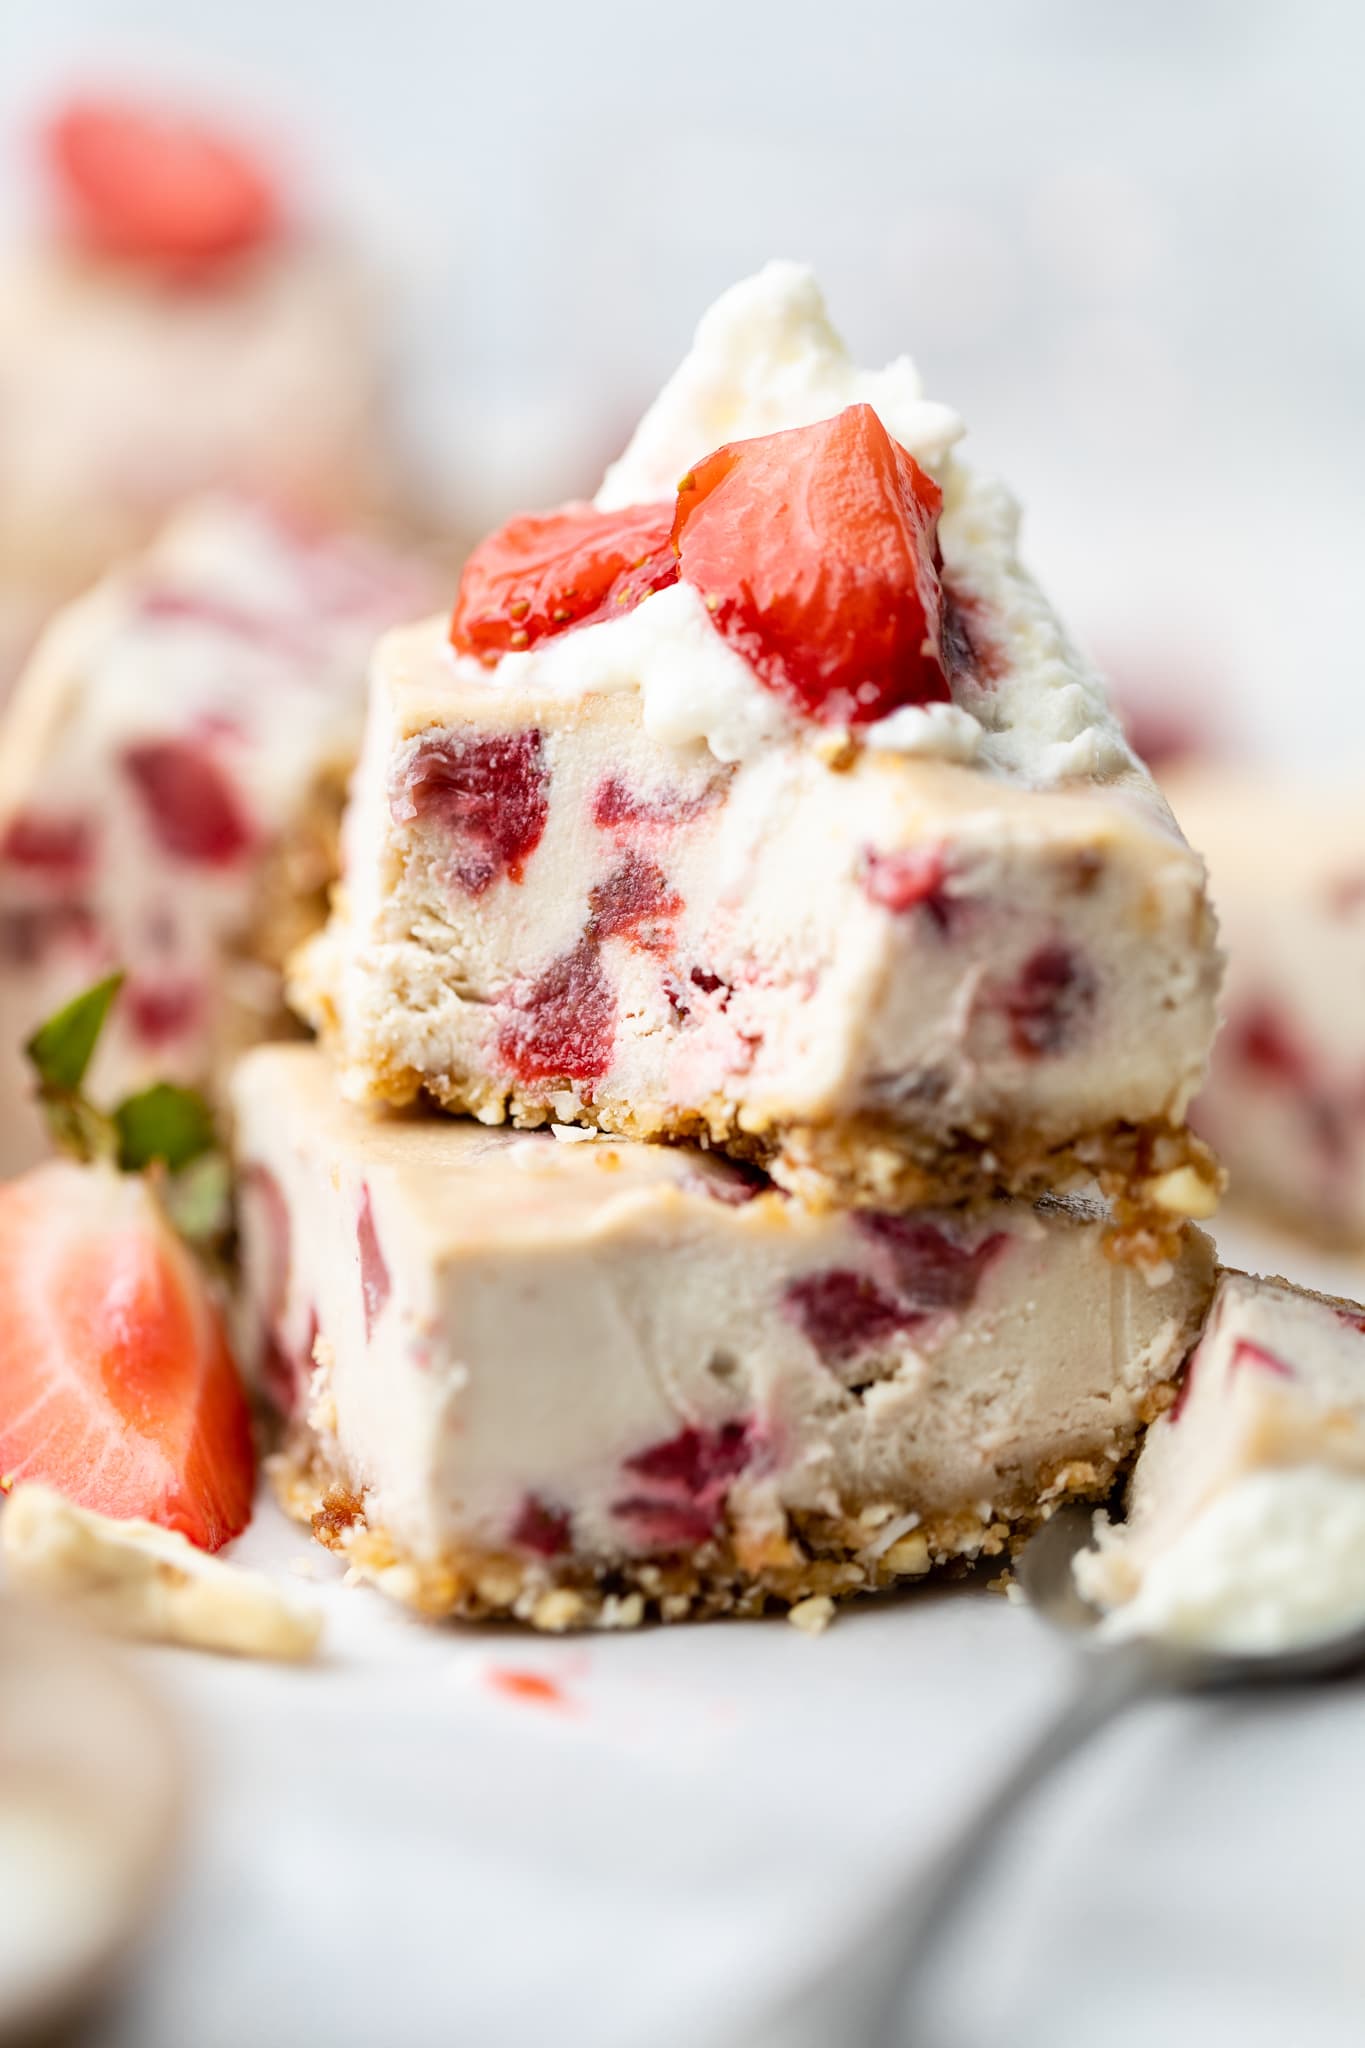
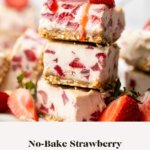
These No Bake Strawberry Cheesecake Bars are the perfect delicious treat. The vegan “cheesecake” filling is swirled with fresh roasted strawberries and bright lemon juice and poured on a yummy no bake cookie crust. This recipe is vegan, dairy-free, gluten free, and Paleo.

Easy No Bake Strawberry Cheesecake Bars
Cheesecake! It’s everyone’s favorite. I mean who doesn’t love a delicious, creamy bite of the good stuff?! But, if you, or someone you love, can’t eat dairy, eating a big slice cheesecake may feel like the worst idea ever. Thankfully, these healthy strawberry cheesecake bars are here to save the day!
Watch How to Make This Recipe
These gluten free strawberry cheesecake bars are dairy-free and vegan. They have a no bake cookie crust and a creamy filling made from soaked whole cashews and roasted strawberries.
More Reader Favorite Strawberry Recipes
- Strawberry Cheesecake Cottage Cheese Ice Cream
- Strawberry Basil Lemonade
- Sparkling Strawberry Limeade
- Strawberry Mango Smoothie
- Strawberry Overnight Oats
- Strawberry Oatmeal Bars
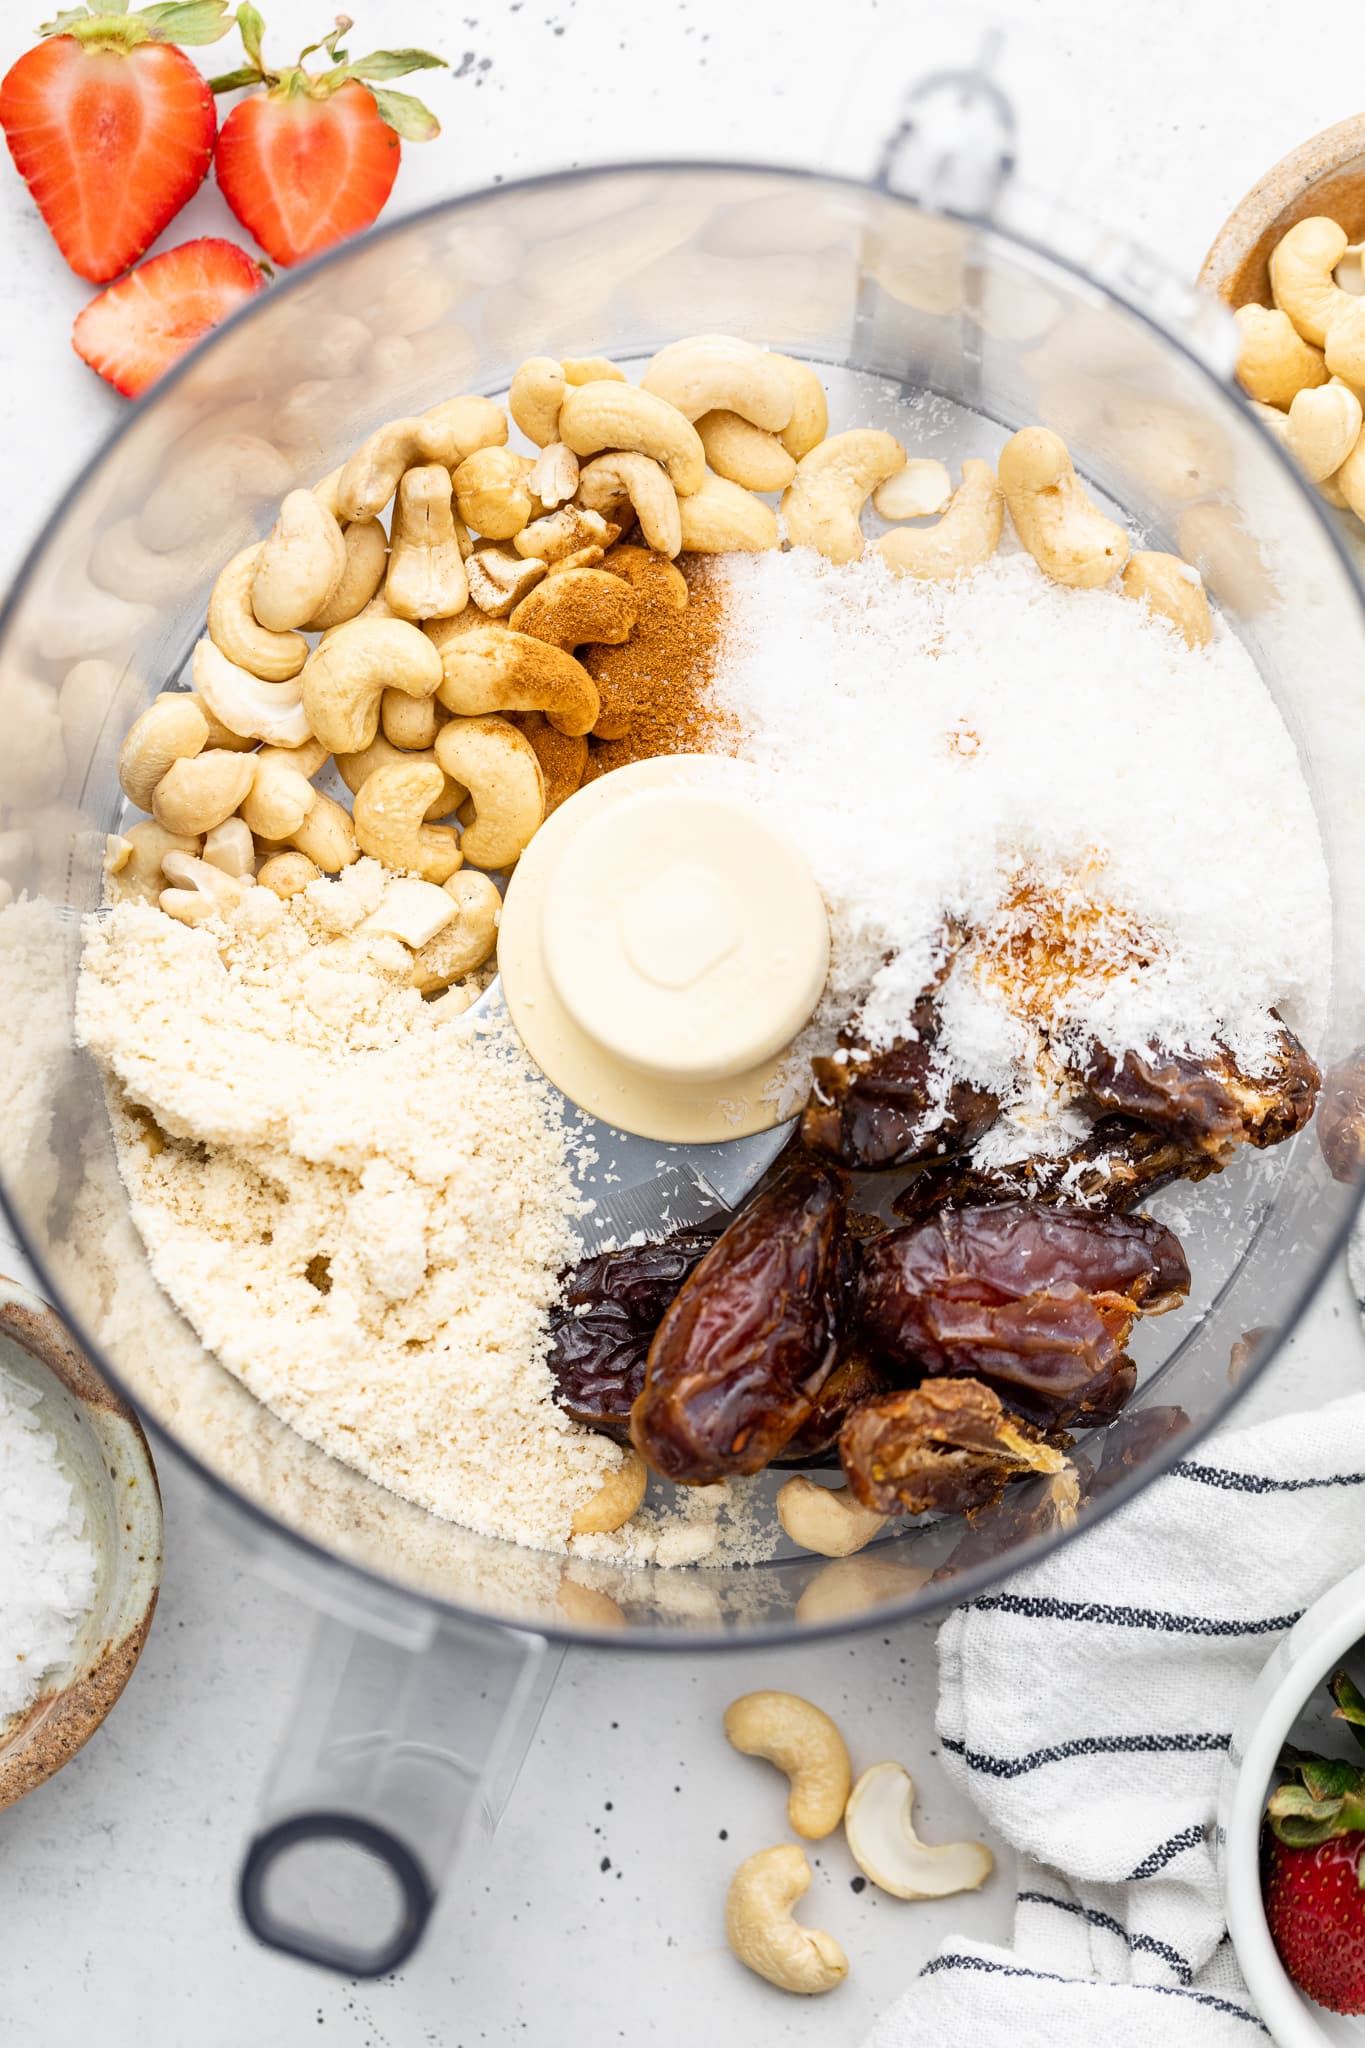
Vegan Cookie Dough Crust Ingredients
The no bake cookie crust for these bars are made from a combination of real food ingredients instead of traditional graham crackers.
For the crust you will need:
- Cashews – whole unsalted raw cashews are used as a base for the crust.
- Dates – these add a sticky sweetness to the crust and help hold things together.
- Almond Flour – you’ll need a bit of blanched almond flour to help make the crust.
- Shredded Coconut – grab unsweetened shredded coconut for the best results.
- Cinnamon – just a pinch of cinnamon helps to give the crust that classic cheesecake crust taste.
- Vanilla – a bit of vanilla extract helps to give the crust the best flavor.
- Sea Salt – a little sea salt helps to give the crust the best flavor and offset the sweetness a bit.
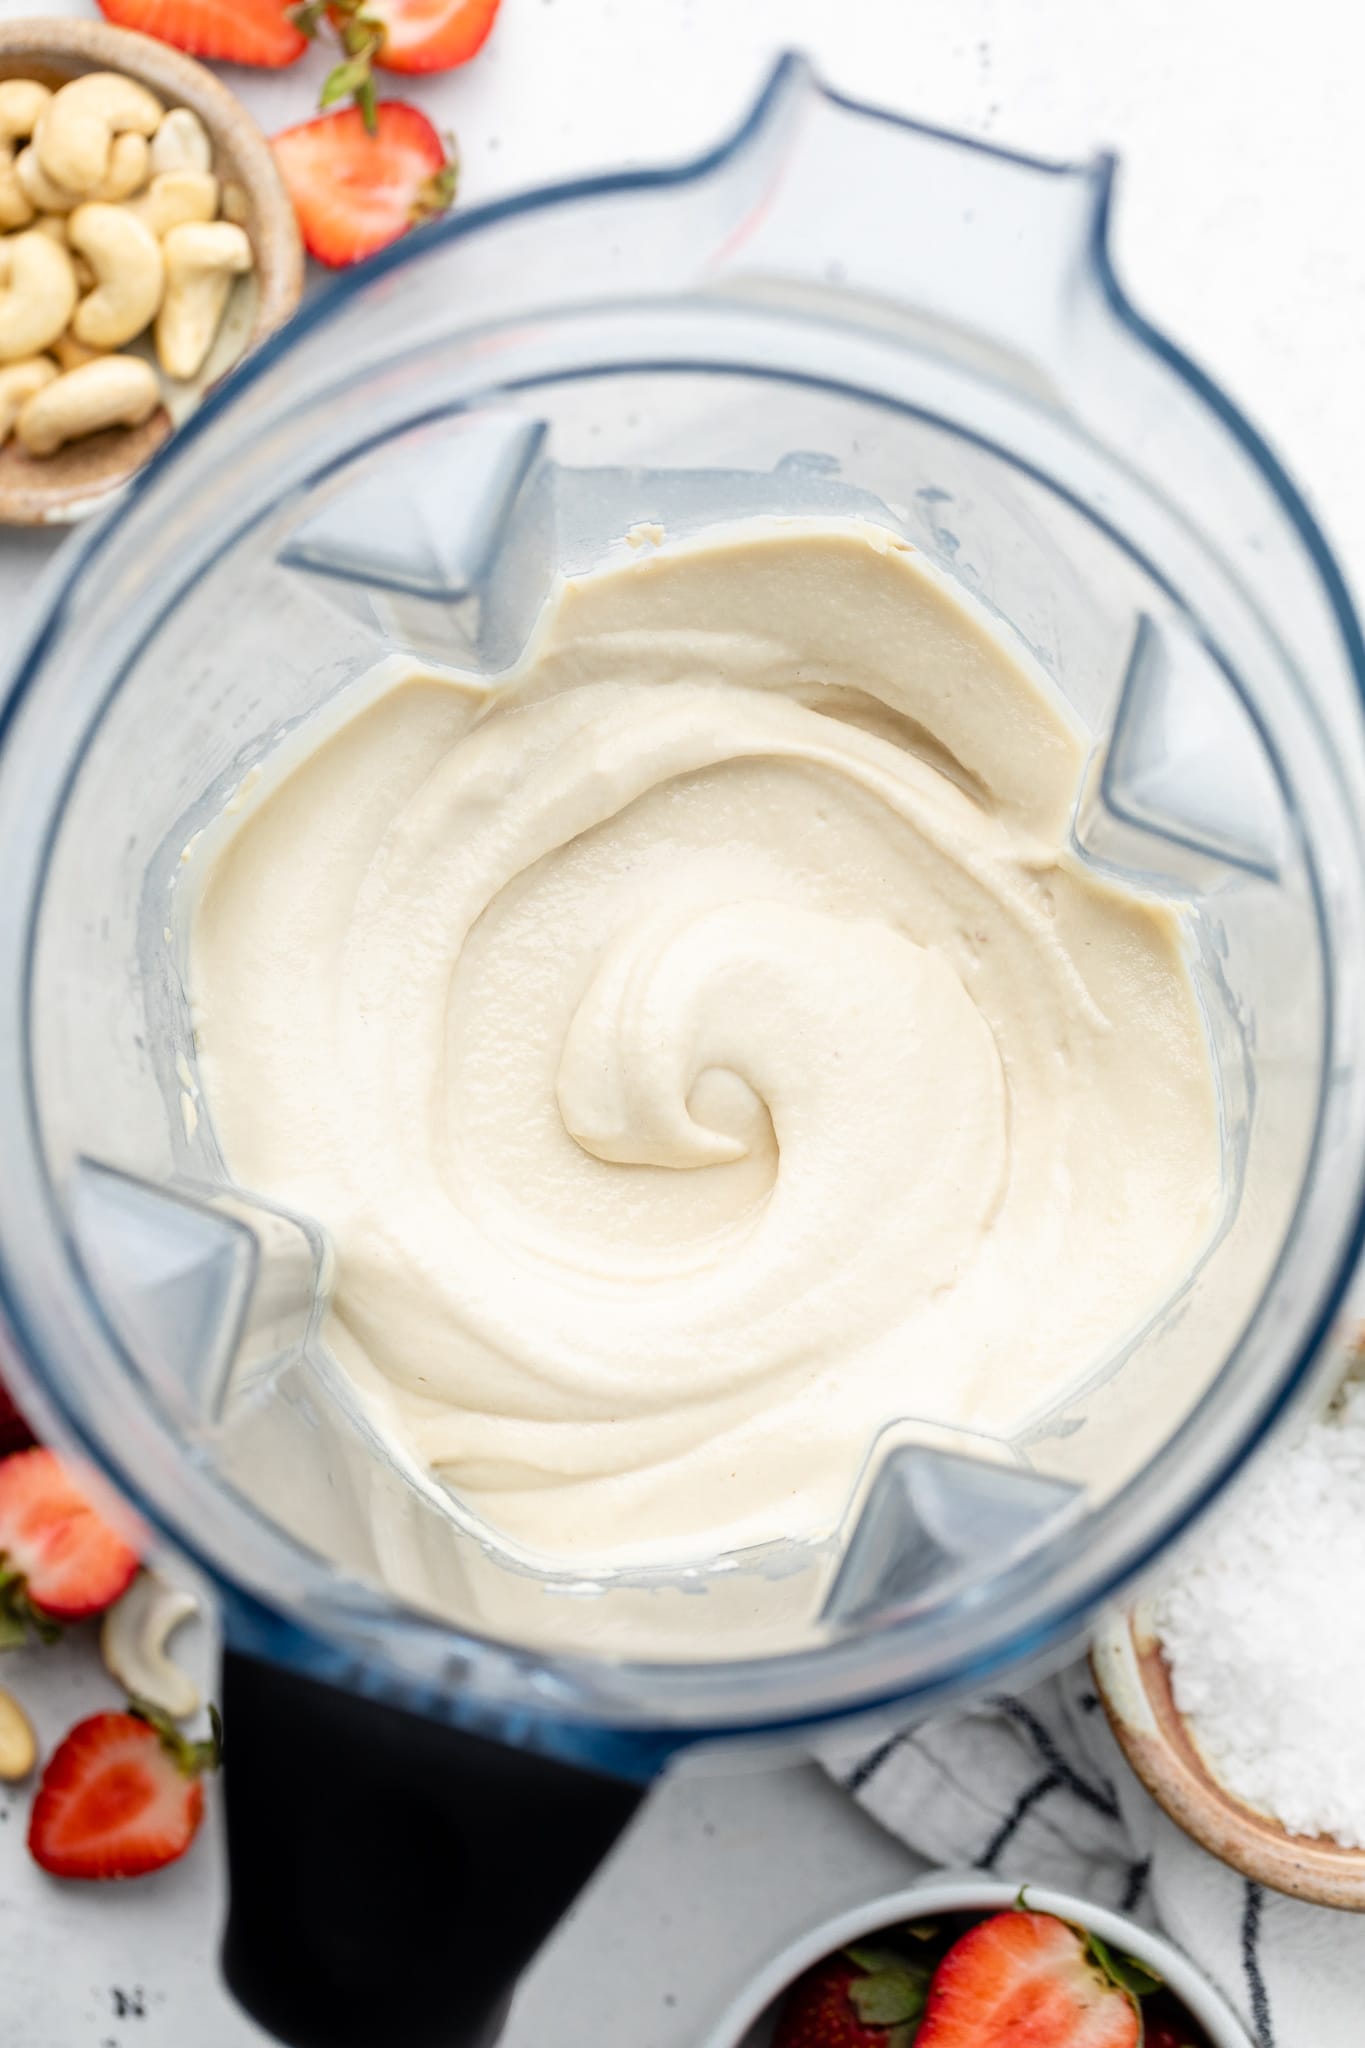
Ok, How in the World Do You Make a Vegan Cheesecake Filling? I’m So Glad You Asked!
These bars get their creamy cheesecake like texture from soaked cashews! When soaked and blended, the cashews break down to form a creamy filling that, once sweetened, tastes just like creamy cheesecake.
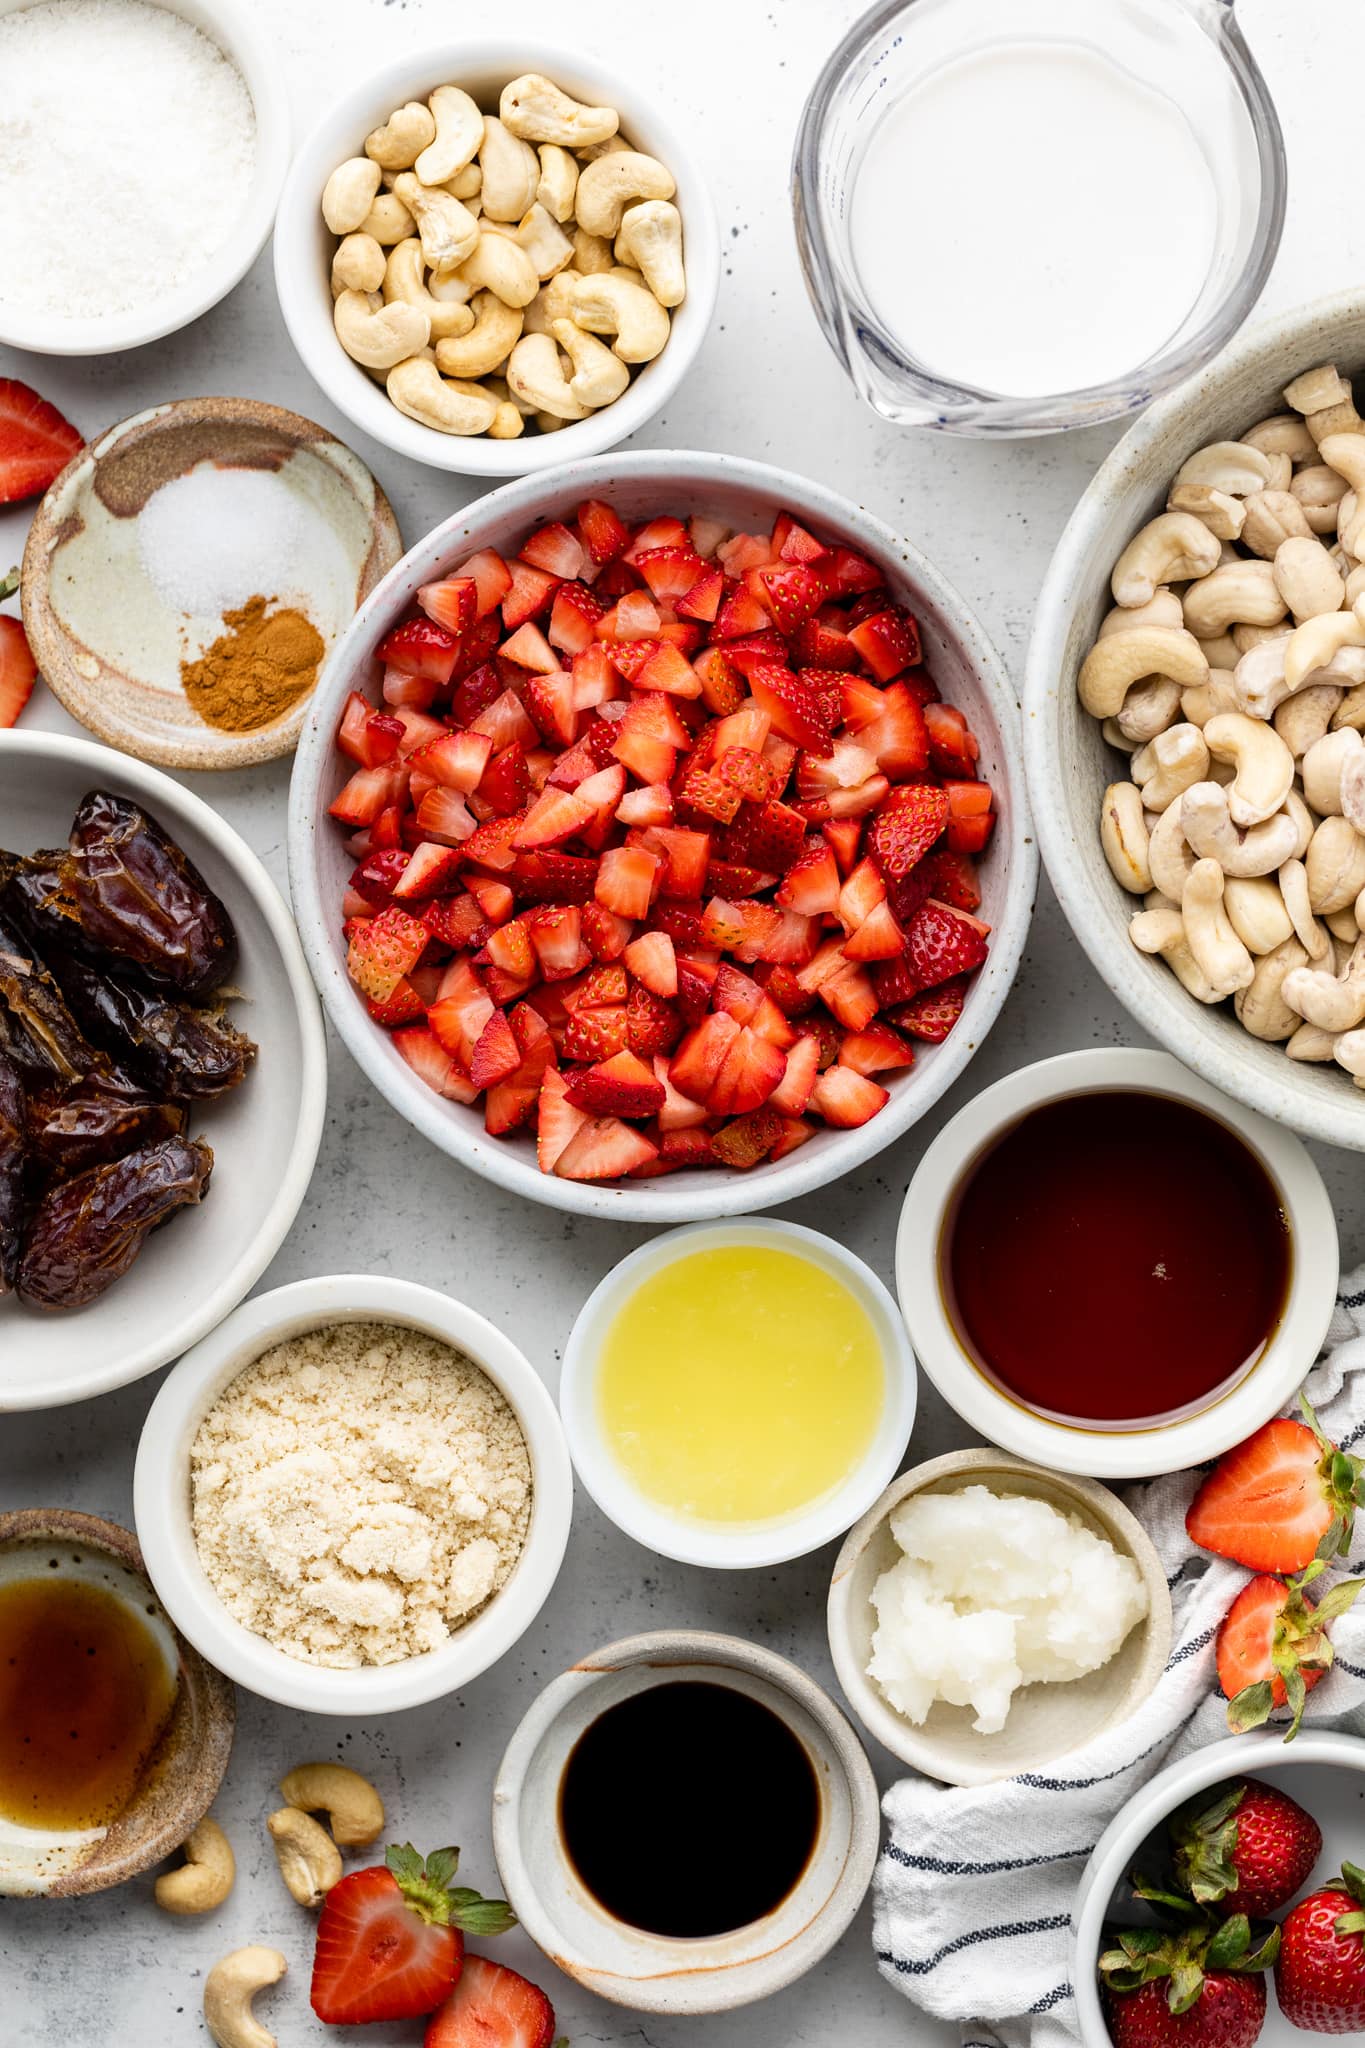
Here is what you’ll need for the cheesecake filling:
Soaked Raw Cashews: Let your whole, unsalted cashews soak overnight in water to get the perfect creamy texture.
Full Fat Coconut Milk: Use canned full fat coconut to help give the filling the right amount of creaminess.
Lemon Juice: Any good cheesecake has a good amount of lemon juice! This recipe starts with three tablespoons but, if you are anything like me, you might want to increase the amount of lemon juice you use for an even more tart flavor.
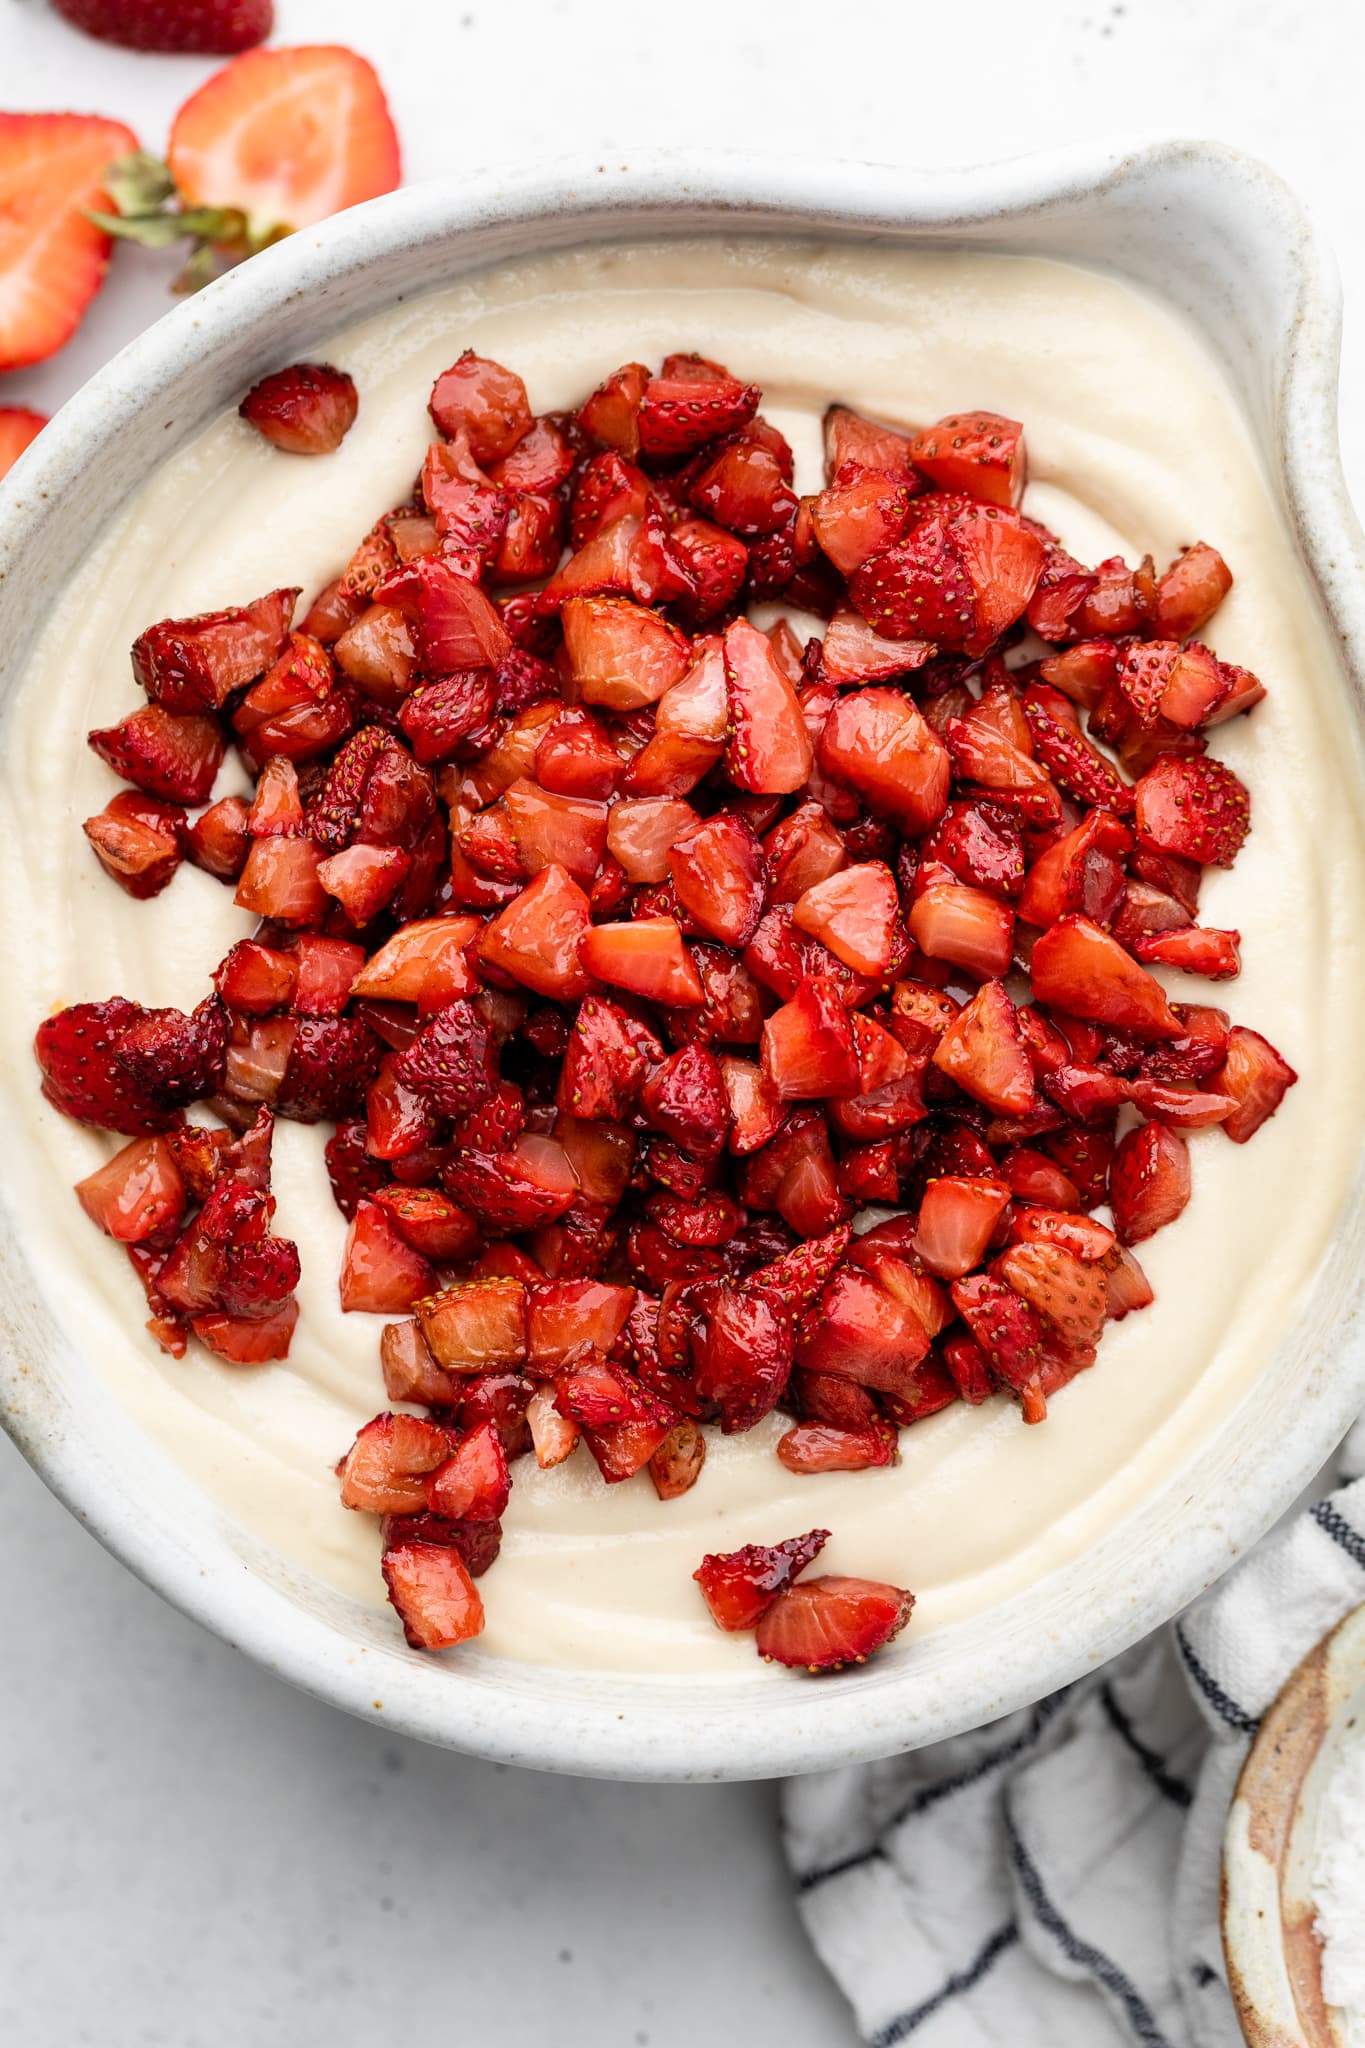
Roasted Strawberries: What makes these bars unique are the delicious addition of balsamic roasted strawberries. They add a delicious depth of juicy strawberry flavor to each bite.
Maple Syrup: These bars are naturally sweetened with pure maple syrup. Feel free to use a bit more if you like your cheesecake on the sweeter side.
Vanilla Extract: An obvious addition that adds just the right amount of maple flavor.
Coconut Oil: Coconut oil helps to solidify the bars once chilled.
Ingredient Variations
- Swap the maple syrup for honey if that’s all you have!
- Want to keep these raw vegan? Skip the strawberry roasting step and just add in fresh chopped strawberries to the filling instead.
- Don’t have almond flour? Swap it for oat flour instead!
Helpful Kitchen Tools
How to Make Vegan Strawberry Cheesecake Bars
Step One: The first step in making these vegan strawberry cheesecake bars is to soak the cashews in water overnight. Soaking the cashews helps to soften them and give the “cheesecake” filling a nice creamy texture.
If you do not have time to soak the cashews overnight, you can pour boiling hot water over them and let the cashews soak for three to four hours until tender. The filling might not be as smooth and creamy, but it will still work.
Step Two: Next, roast the strawberries that will be folded into the cheesecake filling. To do this, chop the strawberries into small pieces. Pour half a tablespoon of balsamic vinegar over the strawberries and stir until they are coated. Spread the strawberries into an even layer on a sheet pan lined with parchment paper. Roast the strawberries at 400 degrees for 20 minutes. Remove them from the oven and let cool.
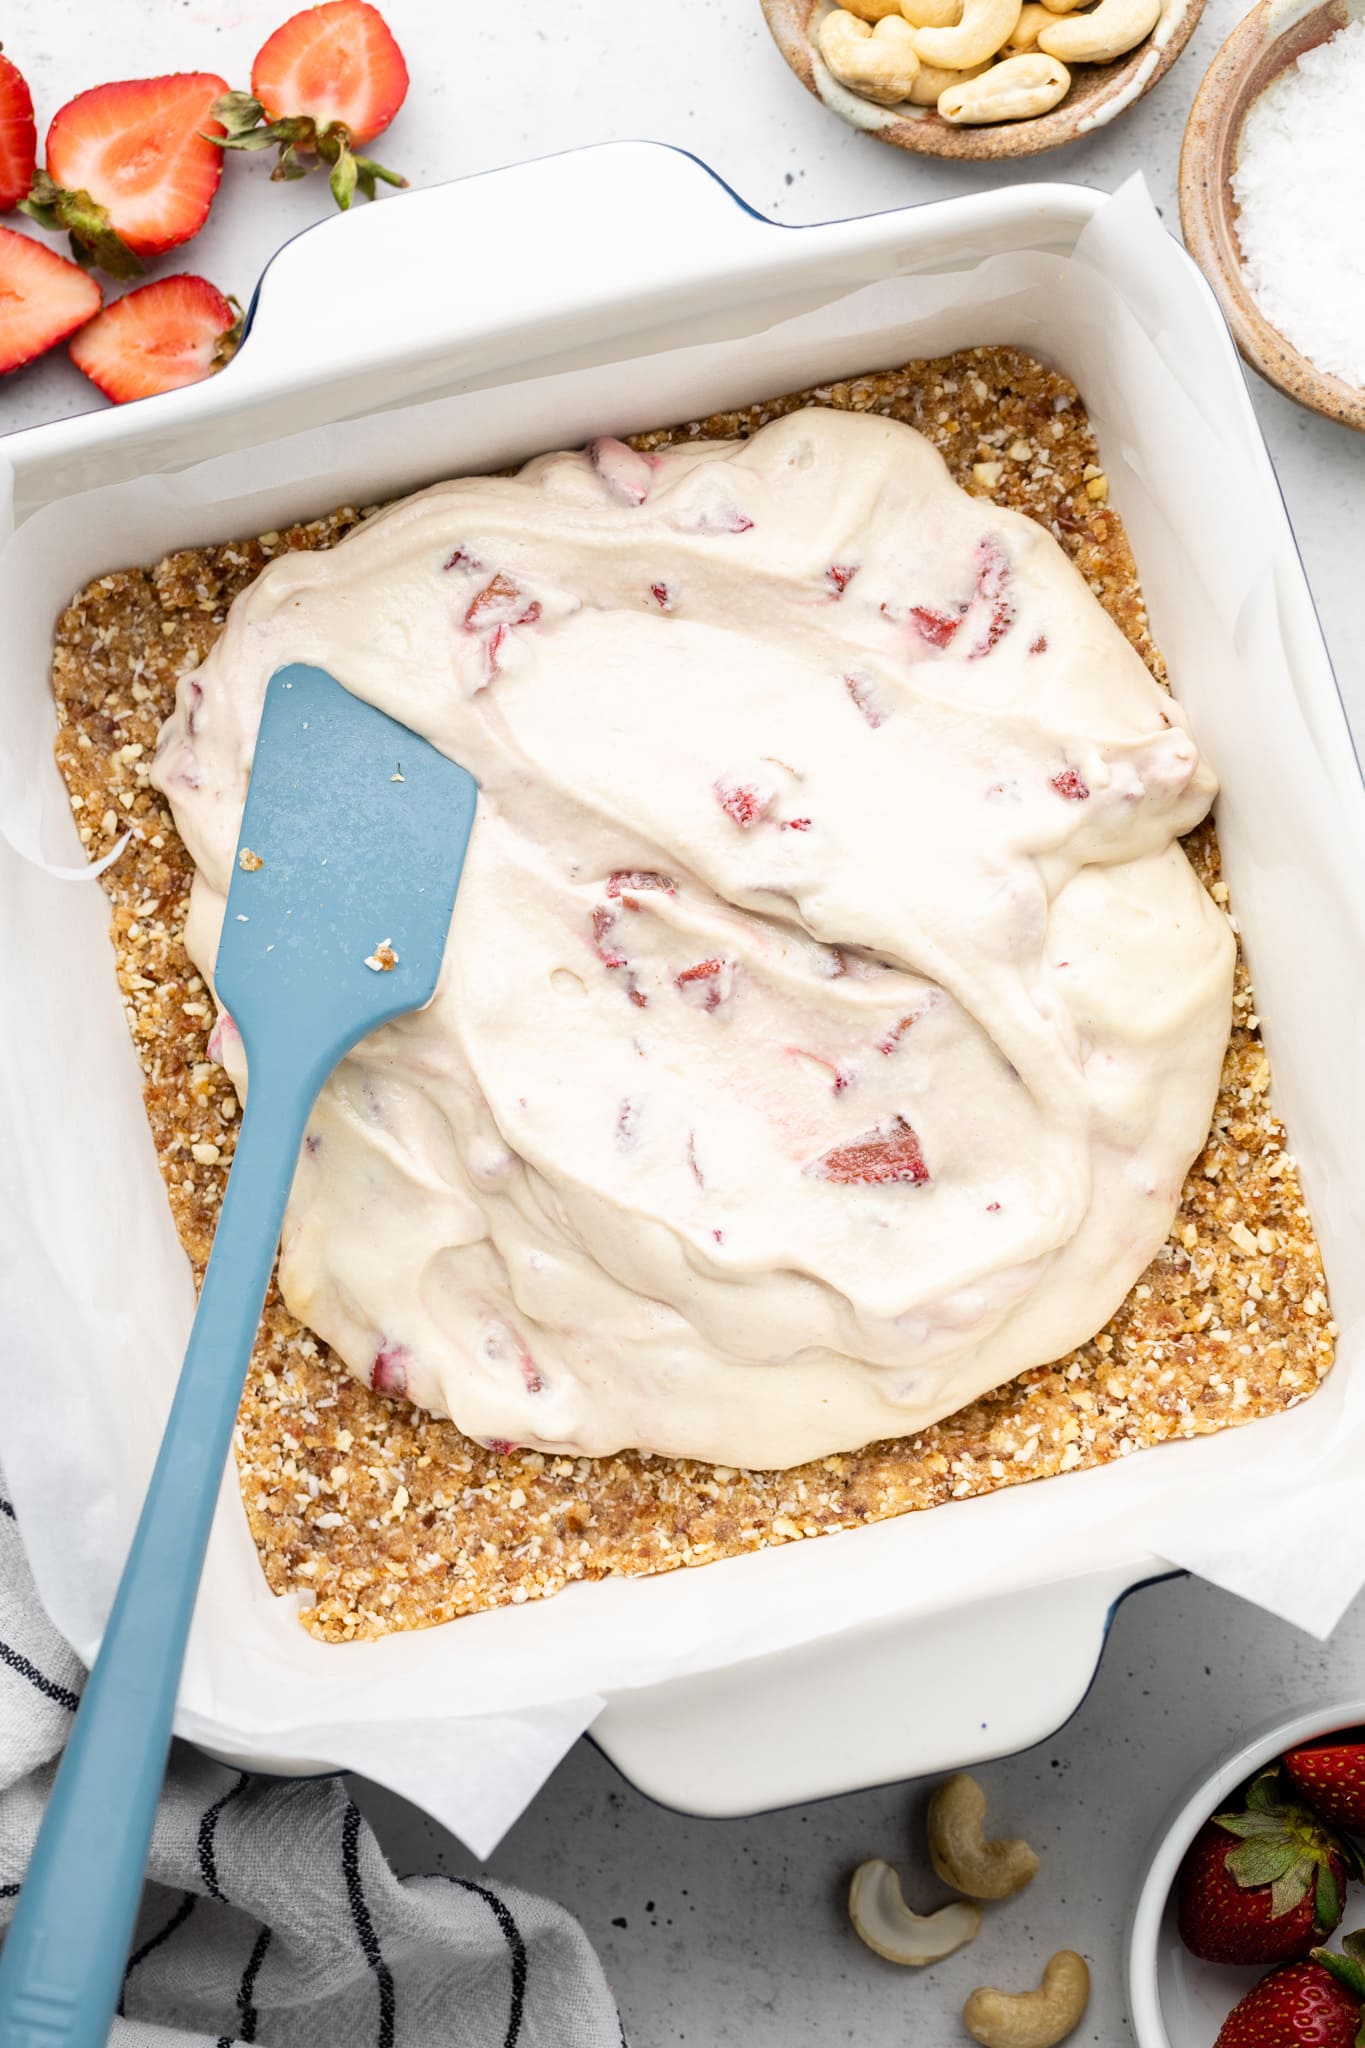
Step Three: While the strawberries are cooling, make the crust! Add the crust ingredients to a food processor and pulse until a sticky dough forms. Use your fingers to press the dough into an 8×8 baking pan that has been lined with parchment paper. Put the crust in the fridge or freezer while you prepare the cheesecake filling.
Step Four: Add the soaked cashews, lemon juice, maple syrup, coconut oil, coconut milk, and vanilla extract to your food process or high powered blender. Blend the filling until silky smooth and creamy. You want to make sure that there are no lumps or bits of cashew remaining in the filling.
Once the filling is blended, pour it into a mixing bowl and add the cooled roasted strawberries. Gently fold the roasted strawberries into the filling. Next, give the filling a taste and adjust it based on your tastes. This is the perfect time to add more lemon juice if you like your cheesecake to be more tart or add more maple syrup if you want the cheesecake to be a bit sweeter.
Step Five: Once the filling tastes how you want it to taste, pour the cheesecake filling over the prepared crust crust.
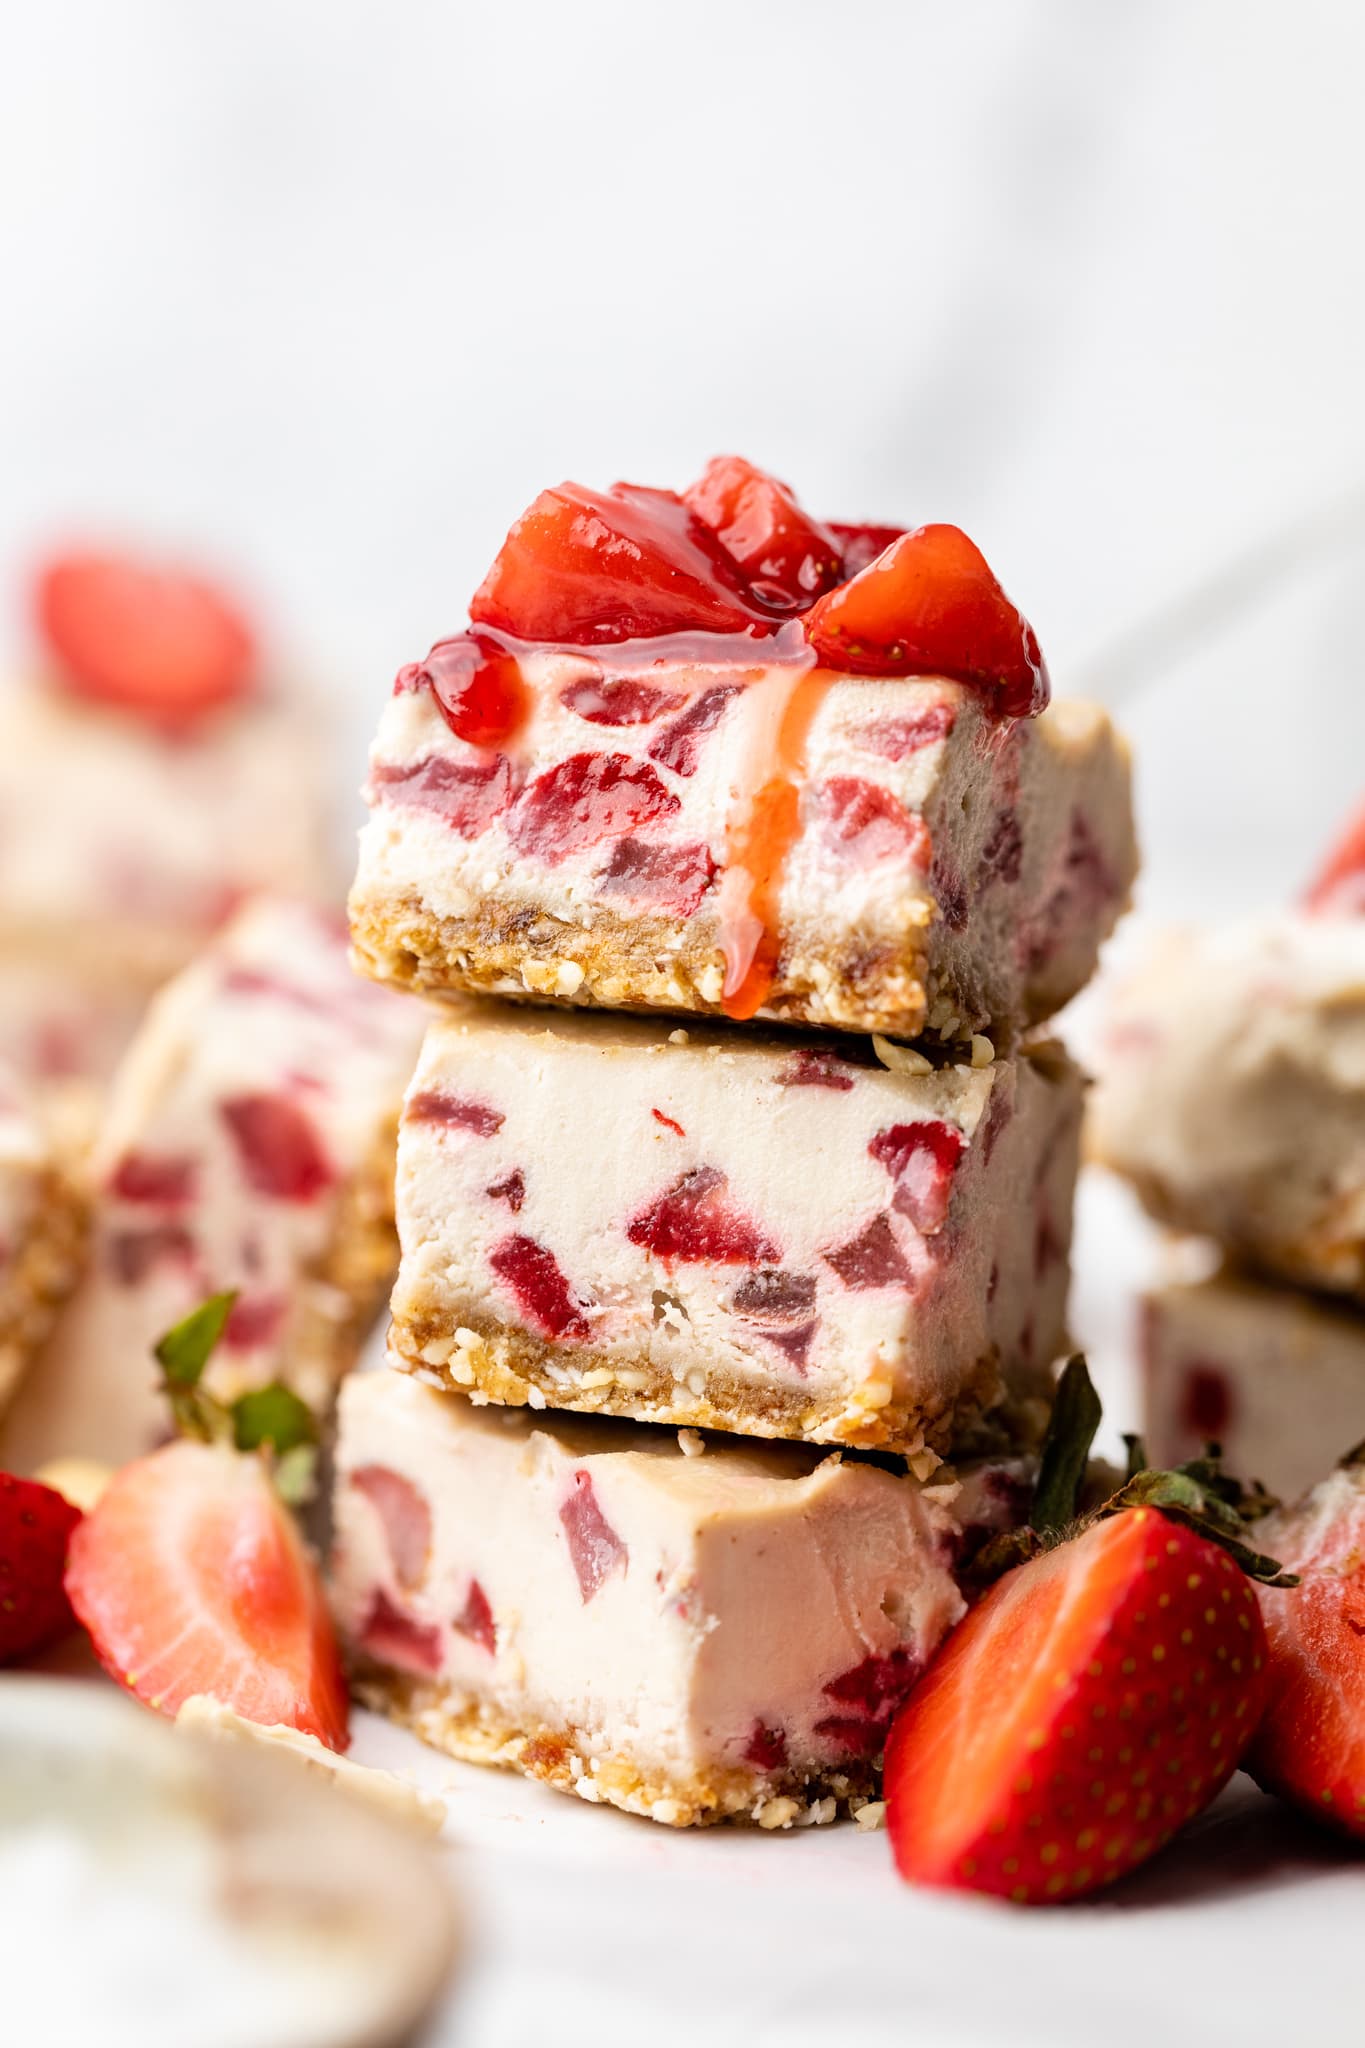
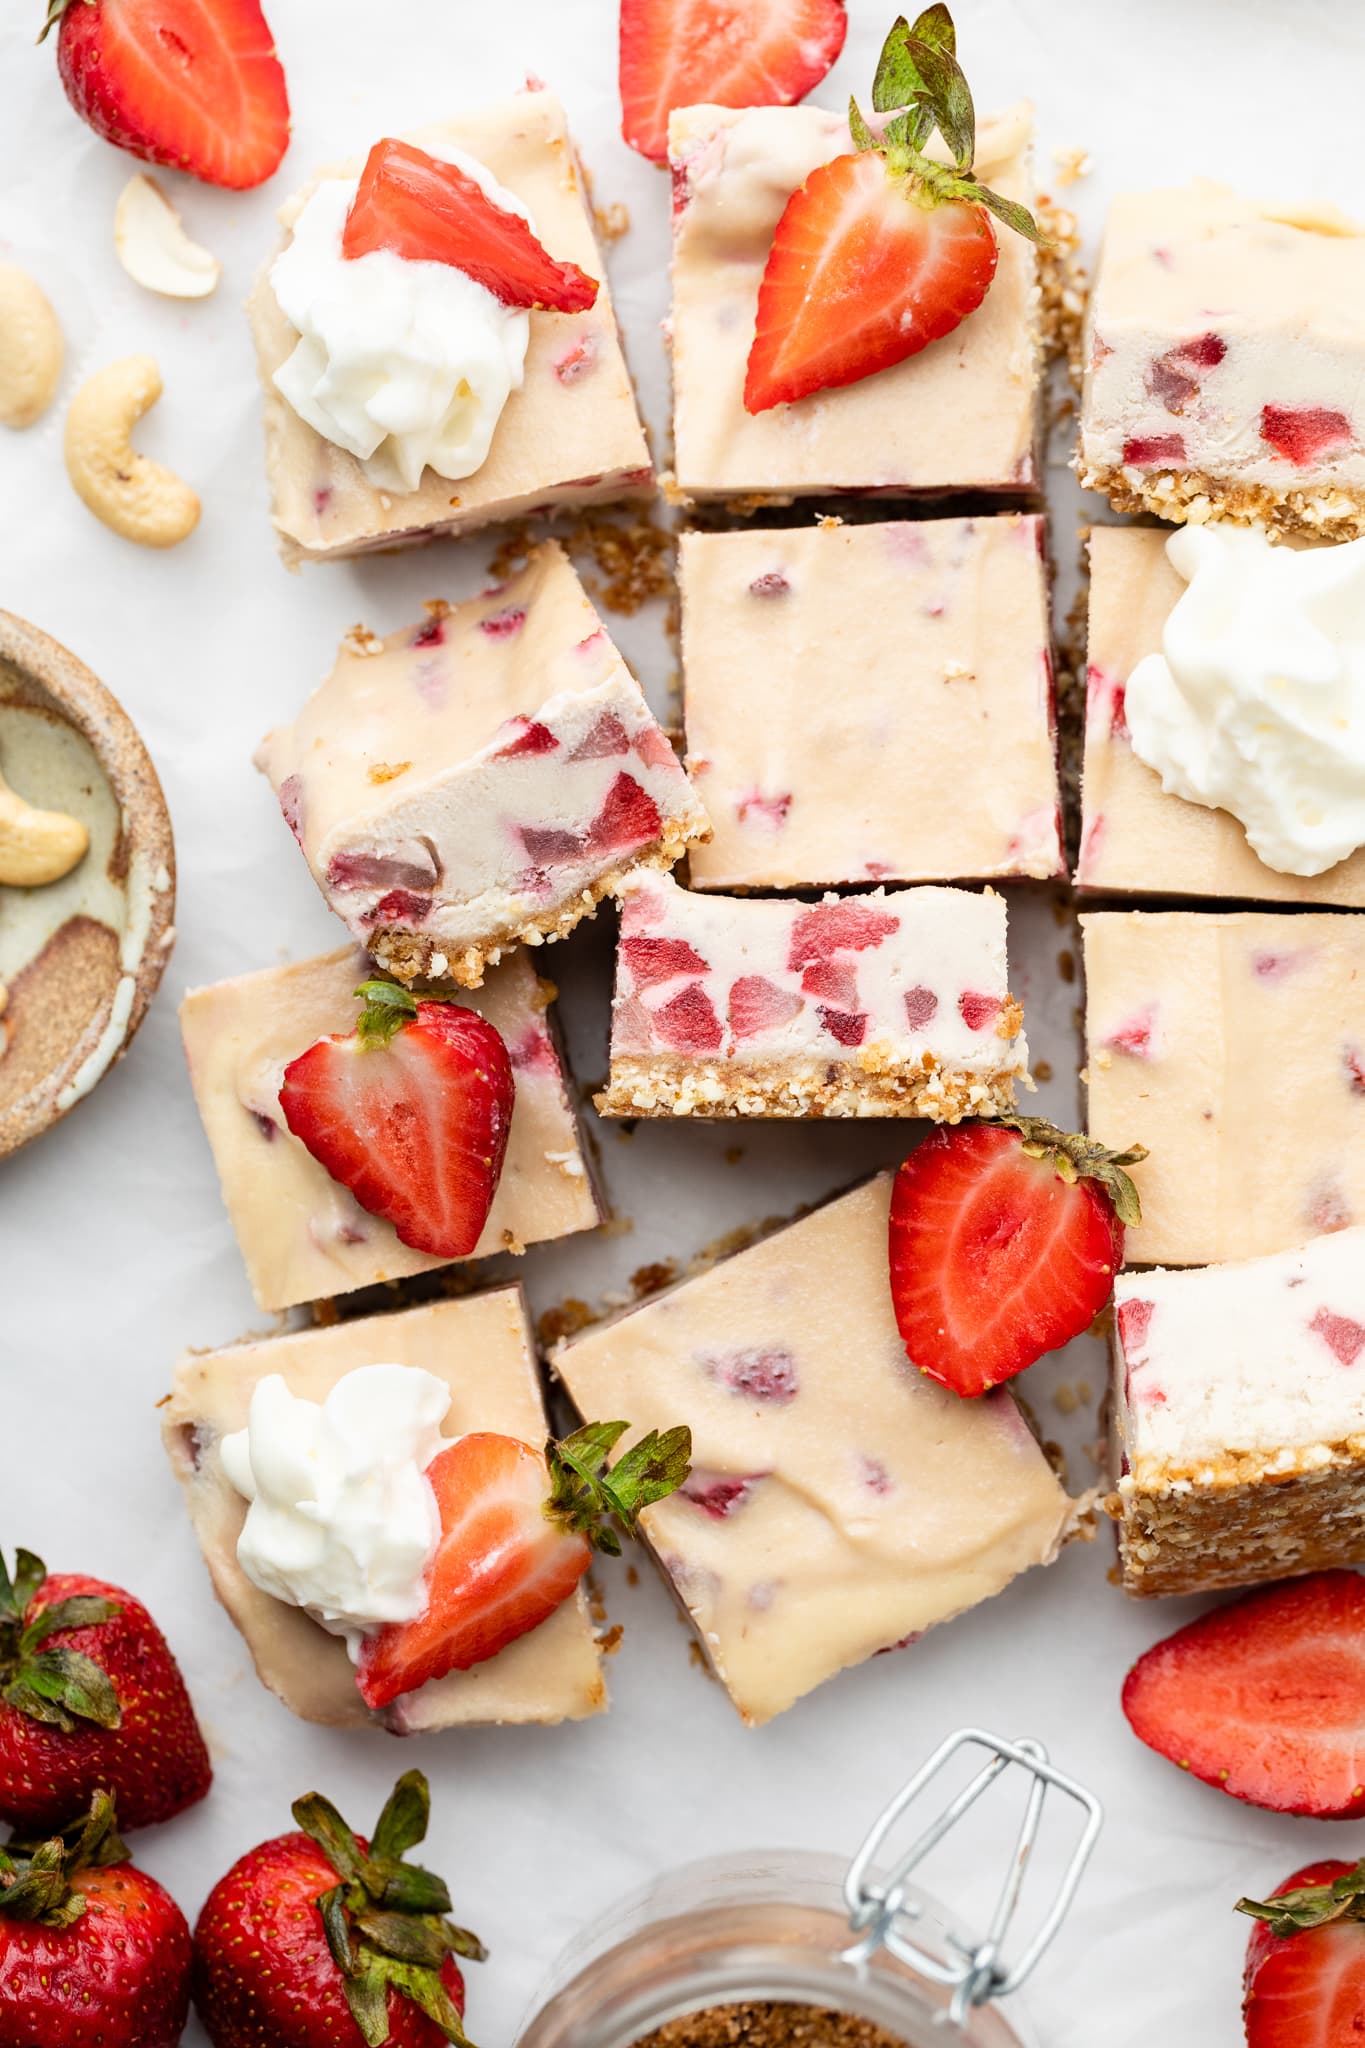
Step Six: Freeze the cheesecake bars overnight or until completely solid. When you are ready to serve, remove the cheesecake bars from the freezer and let sit on the counter for around 10 minutes to slightly soften. Then, use a sharp knife to slice the bars into 9 or 16 pieces. Serve and enjoy!
Tips and Tricks
These bars are incredibly easy to make but a few helpful hints never hurt.
Here are a few of my favorite tips and tricks to make sure that they come out absolutely perfect every time:
- Do not forget to remove the pits from your dates before adding them to the food processor.
- Do not over process the crust. It should be sticky, similar to a cookie dough, not smooth like a nut butter.
- Let the bars freeze until they are completely solid before slicing. It will be tempting to dive in right away but freezing them until firm makes the bars much easier to slice.
- It takes a little extra work, but I like to use my food processor for the cheesecake crust and my high powered blender for the filling. I find that the blender gets the filling a bit more smooth than the food processor.
- I like to tap the pan on the counter to remove any air bubbles in the filling before placing it in the freezer. This helps to ensure that the bars come out perfectly smooth.
- You can run your sharp knife under warm water before slicing to ensure that you get a clean slice.
How to Store No Bake Cheesecake Bars
These bars store best in the freezer. I like to freeze the bars individually and then add them to a freezer safe storage bag in the freezer. When you are ready to eat, pull however many bars you would like to eat out of the bag. Let the bars thaw on a plate for a few minutes before digging in!
More Dairy Free Dessert Recipes
- Strawberry and Cream Popsicles
- Vegan Pumpkin Cheesecake Bars
- Healthy Key Lime Pie Bars
- No Bake Lemon Blueberry Cheesecake Bars
I hope you give these Strawberry Cheesecake Bars a try! They are full of strawberry flavor and delicious! If you do give this recipe a try, let me know!
Leave a comment with a star rating below. You can also snap a photo & tag @allthehealthythings on INSTAGRAM. Your reviews and ratings help support All the Healthy Things and make it possible for me to continue to create the recipes you trust and love.
Print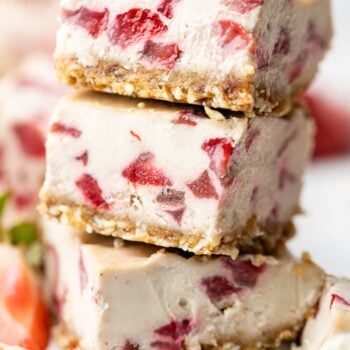
No Bake Strawberry Cheesecake Bars
- Prep Time: 12 hours
- Cook Time: 20 minutes
- Total Time: 12 hours
- Yield: 9 1x
- Category: Dessert
- Method: No Cook
- Cuisine: American
- Diet: Gluten Free
Description
These No Bake Strawberry Cheesecake Bars are the perfect delicious treat. The vegan “cheesecake” filling is swirled with fresh roasted strawberries and bright lemon juice and poured on a yummy no bake cookie crust. This recipe is vegan, dairy-free, gluten free, and Paleo.
Ingredients
No Bake Cookie Crust
- 6 pitted medjool dates
- ¾ cup cashews
- ¼ cup almond flour
- ¼ cup finely shredded coconut
- ¼ tsp cinnamon
- 1 teaspoon vanilla extract
- ½ tsp sea salt
Cheesecake Filling
- ½ pound strawberries, chopped
- ½ tablespoon balsamic vinegar
- 2 cups whole cashews
- ½ cup full fat coconut milk
- 3 tablespoons fresh lemon juice
- ⅓ cup maple syrup
- 1 teaspoon vanilla extract
- 2 tablespoons coconut oil
Instructions
- Soak 2 cups of cashews in water overnight for the cheesecake filling.
- Next, make the roasted strawberries. Chop ½ pound of strawberries into small pieces. Pour half a tablespoon of balsamic vinegar over the strawberries and stir until they are coated. Spread the strawberries into an even layer on a sheet pan lined with parchment paper and roast at 400 degrees for 20 minutes. Remove them from the oven and let cool.
- Add the crust ingredients to a food processor and pulse until a sticky dough forms. Press the dough into an 8×8 baking pan lined with parchment paper. Put the crust in the fridge or freezer while you prepare the cheesecake filling.
- Add the soaked cashews, lemon juice, maple syrup, coconut oil, coconut milk, and vanilla extract to your food process or high powered blender. Blend the filling until silky smooth and creamy.
- Transfer the filling to a mixing bowl and add the cooled roasted strawberries. Gently fold the roasted strawberries into the filling. Give the filling a taste and adjust the level of sweet or tart to your taste.
- Pour the cheesecake filling over the prepared crust. Freeze the cheesecake bars overnight or until completely solid.
- When you are ready to serve, remove the cheesecake bars from the freezer and let sit on the counter for around 10 minutes to slightly soften. Use a sharp knife to slice the bars into 9 or 16 pieces. Serve and enjoy!
Recipe by: Ashlea Carver / All the Healthy Things | Photography by: THE MINDFUL HAPA


Absolutely perfect! Cool and tasty without being too sweet. This is a fantastic recipe even if you can eat dairy and gluten!
I’m so glad you liked the recipe, Carrie! Thanks for sharing!
I made these for 4th of July this year! I made mine in a spring form pan so it presented like cheesecake the first day I served it and the second day I chopped them into bite size pieces. Everyone loved them both days! Great recipe and easy to make!
Take the soak the cashews overnight advice!
Hi Ashlea,
These bars are exquisite!
I wanted to give it 5 stars and the icon was so small my finger accidentally touched 3.
I wasn’t able to change it, sadly.
But these bars are definitely a 6 out of 5!
Hands-down the BEST dessert I think I have ever made. If you eat them totally frozen, it’s like an ice cream bar with the best cookie ever. Serious yum factor.
These are so good! Very refreshing—perfect summer treat. I love that you could make them more sweet or tart depending on preference. The crust is awesome—could turn it into a granola bar and eat it on its own!
These are so good!! I made them last weekend to celebrate a special occasion and not only were they easy to make, they were also absolutely delicious. Also love that I can store them in the freezer so they’ll last awhile :)!
Yesss, I’ve been looking for a strawberry raw bar recipe using CLEAN ingredients! These look delicious, can’t wait to try them!