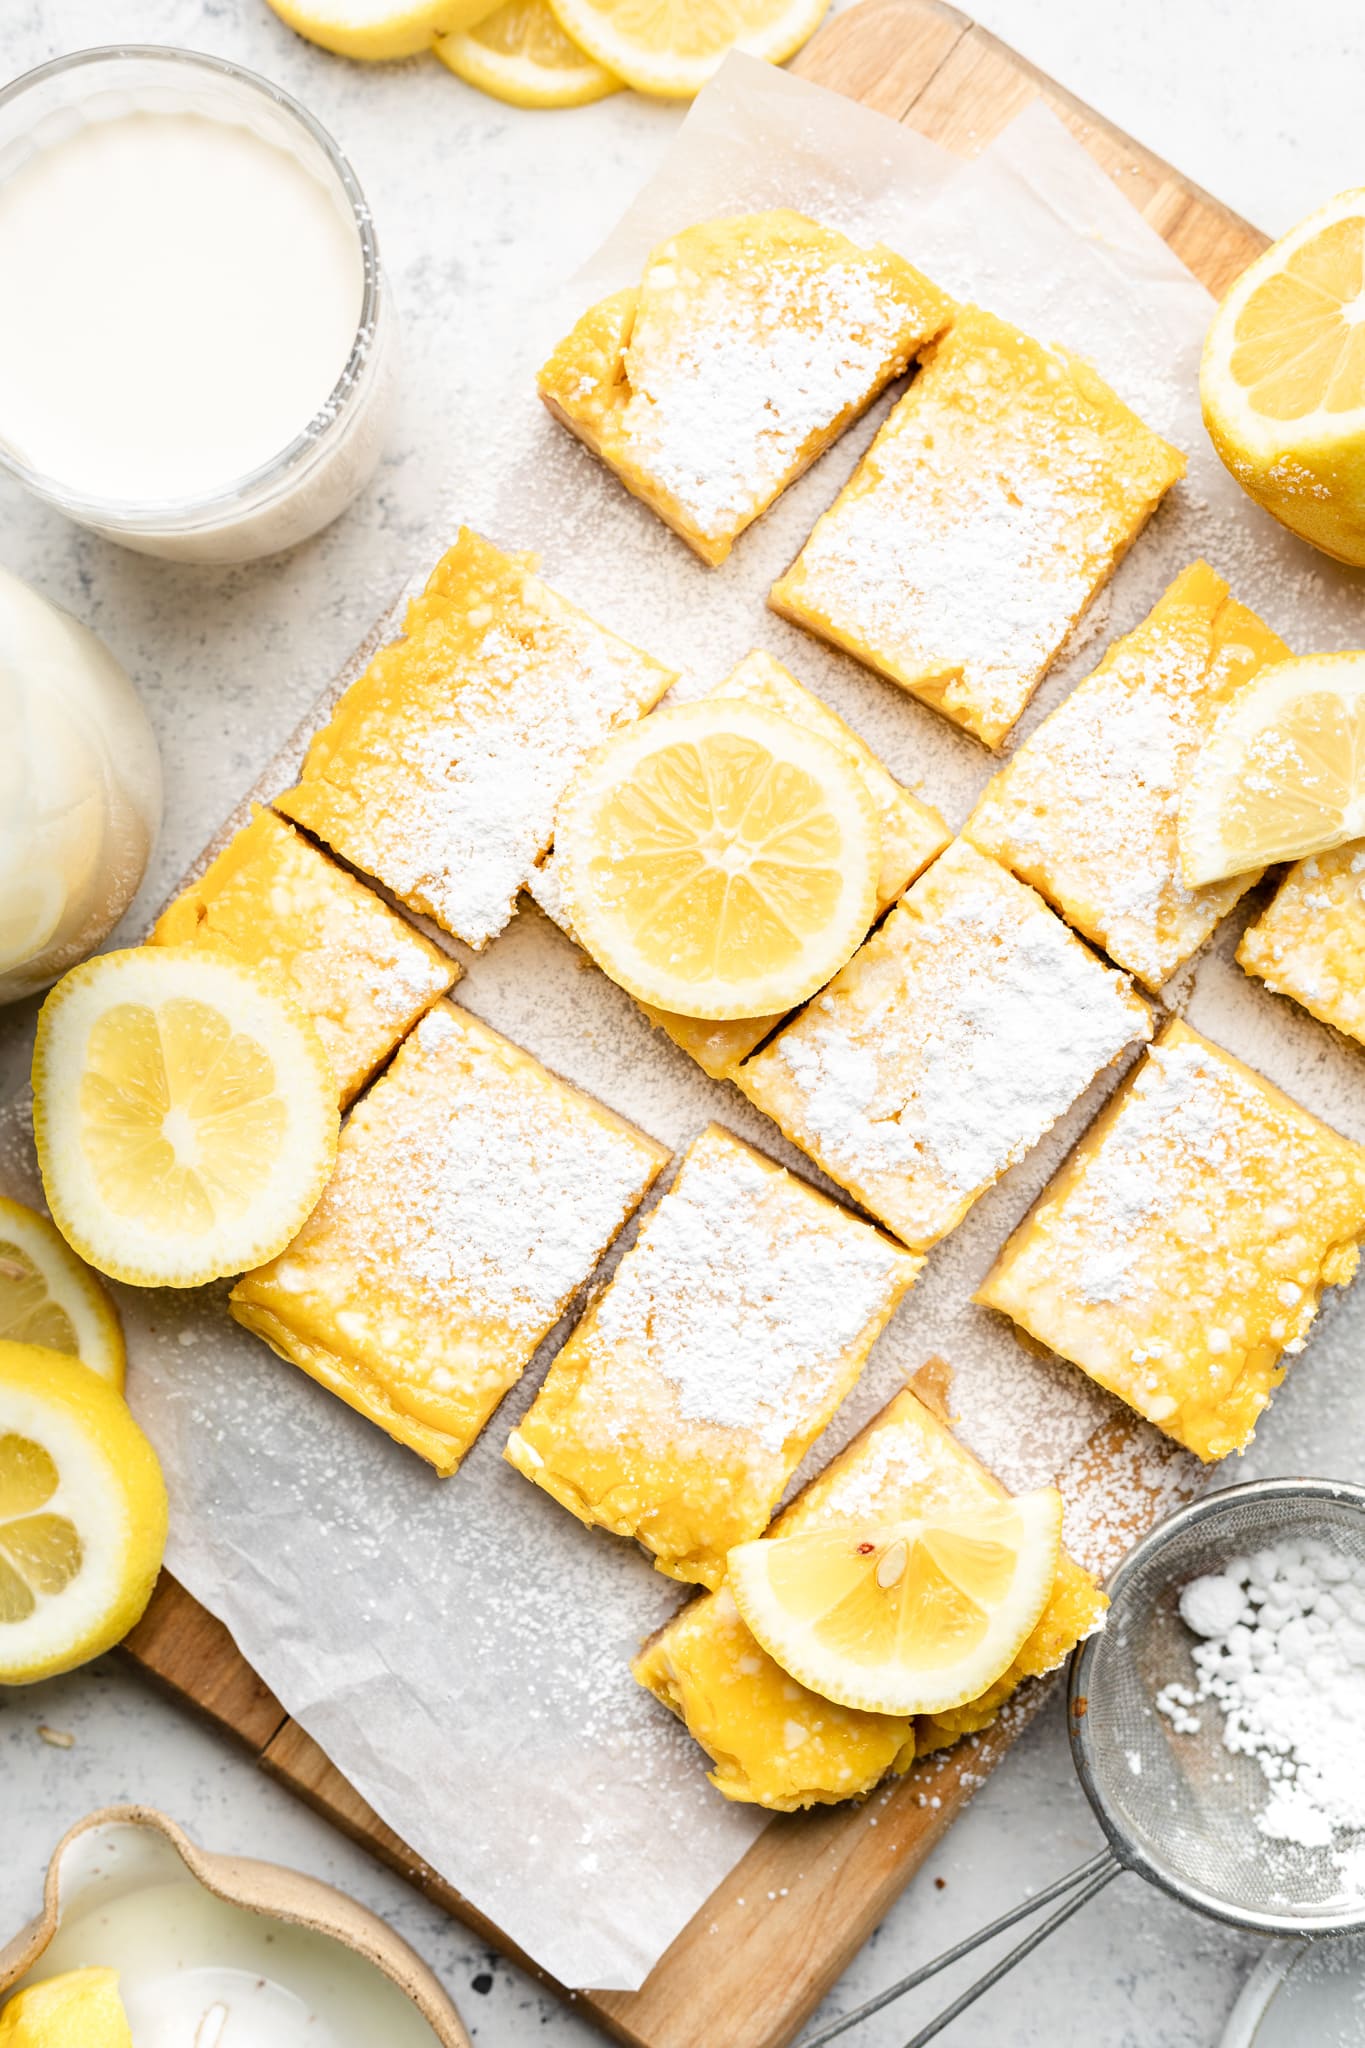
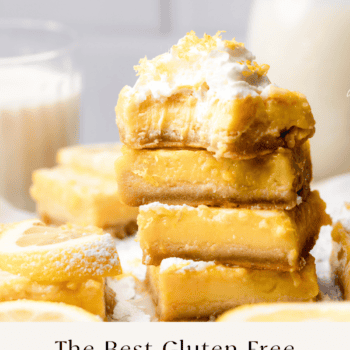
The best Gluten Free Lemon Bars! These bars are a healthier version of the classic made with fresh tart lemon juice, lemon zest, and just the right touch of sweetness from pure maple syrup. The bright lemon filling sits on a delicious almond flour crust that is naturally gluten free and so easy to make. You won’t be able to get enough of these!

The Most Delicious Gluten Free Lemon Bars
Nothing screams spring more than lemon and these juicy gluten free lemon bars taste just like spring! I love a good lemony dessert and these do not disappoint. This a gluten free version of the classic lemon bar but trust me you won’t be compromising on texture or flavor. Everyone will love them, whether they’re gluten free or not!
The bars are made from simple, real food ingredients and sweetened with maple syrup. The end result is a sweet, yet tart, dessert that everyone can enjoy even if they have a food allergy or sensitivity to gluten or dairy!
Watch How to Make This Recipe
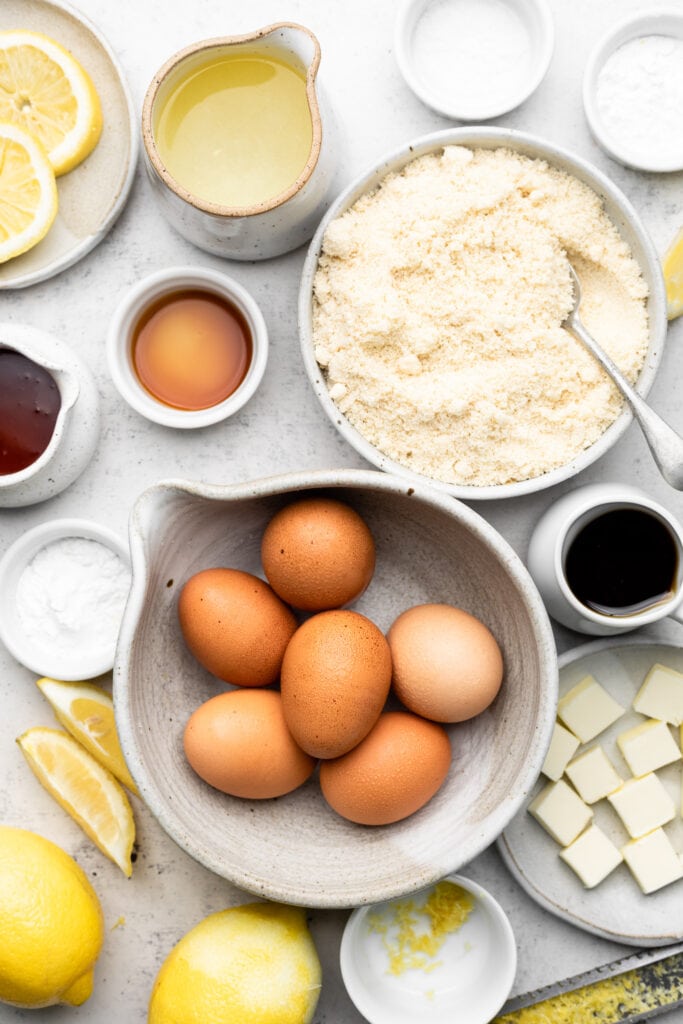
Gluten Free Lemon Bar Ingredients
- Almond Flour: for the best results you will want to use blanched almond flour. Blanched almond flour is made from almonds that have their skin removed which results in a very fine almond flour that is more similar to the texture of wheat flour.
- Tapioca Starch: tapioca starch functions as a bit of binder in the crust to keep it from falling apart. We’ll also use a bit in the lemon filling.
- Maple Syrup: a touch of maple syrup helps to give everything the right touch of sweetness.
- Butter: cold butter gives the texture of the bars a shortbread crust.
- Lemon Zest: this helps to ensure that the lemon flavor rings throughout the entire dessert.
- Sea Salt: just a pinch of sea salt helps to balance out the sweetness of the maple syrup.
- Lemon Juice: for the best results, I recommend using freshly squeezed lemon juice for these bars. Fresh lemon juice will give your lemon bars the best flavor.
- Large Eggs: eggs are incredibly important in this recipe as they are what essentially hold the bars together and help to create the delicious lemon custard.
- Vanilla Extract: a bit of vanilla extract helps to round out the flavor of the bars.
Ingredient Substitution Questions
Can I substitute coconut flour for almond flour?
No. Coconut flour cannot be used as a one-to-one substitute for almond flour. Coconut flour is very drying and will not give the crust the best texture.
I have a nut allergy, what can I substitute for almond flour?
I have not tested these lemon bars with any other flour than almond flour. However, I do think that the crust of the lemon bars could be made with oat flour or possibly a gluten free flour blend.
Can I substitute coconut oil for butter?
Yes! If you need to make these bars dairy-free, you can substitute the butter for coconut oil instead. Be sure the coconut oil is solid and not melted for the best results.
Helpful Kitchen Tools
How to Make This Gluten Free Lemon Bar Recipe
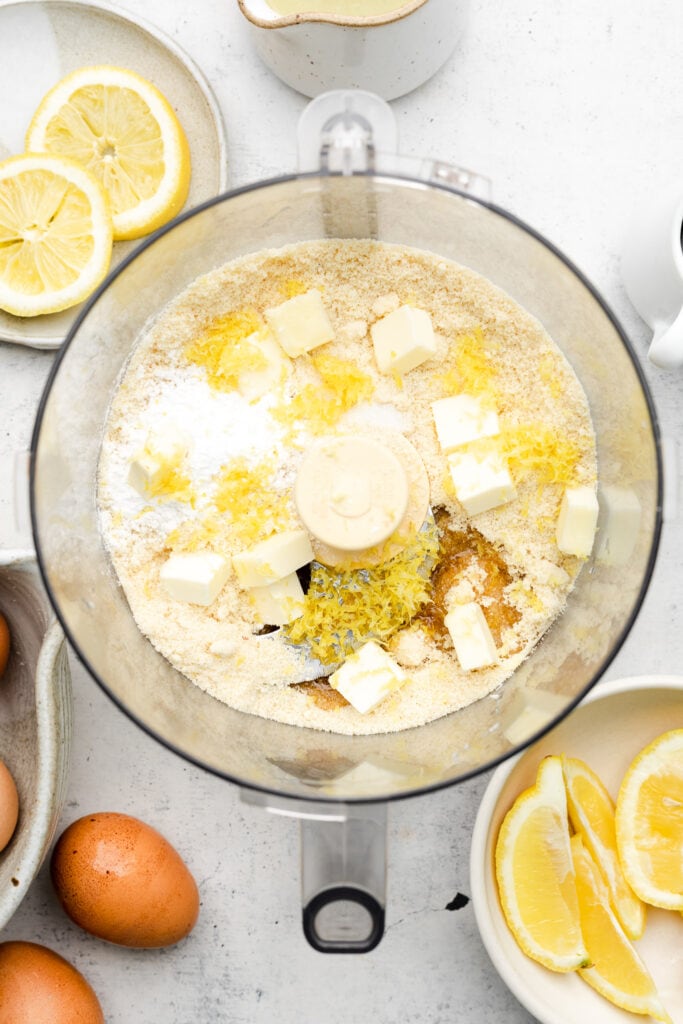
Step One: First start by making the crust. Add the almond flour, tapioca starch, maple syrup, cold diced butter, lemon zest, and sea salt to a food processor. Process the ingredients until a slightly sticky ball of dough forms. This process should not take long. You may have to stop the processing to scrape down the sides a bit to ensure that everything is well combined.
Step Two: Next, remove the crust dough from the food processor and press it evenly into an 8×8 pan that has been lined with parchment paper. Bake the crust at 350 degrees for 15-20 minutes until golden.
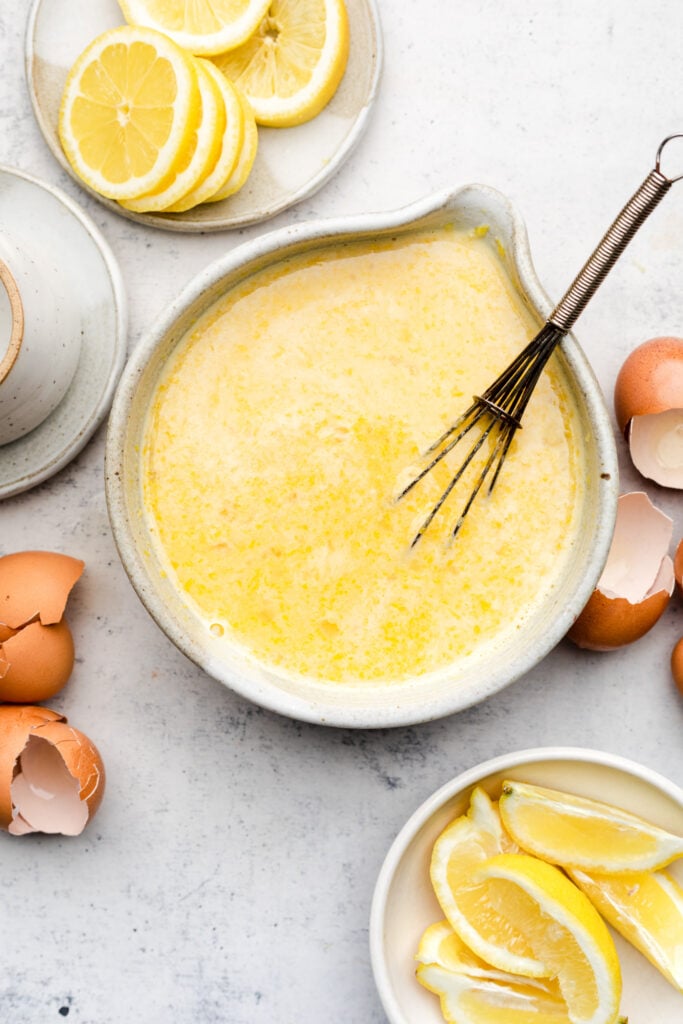
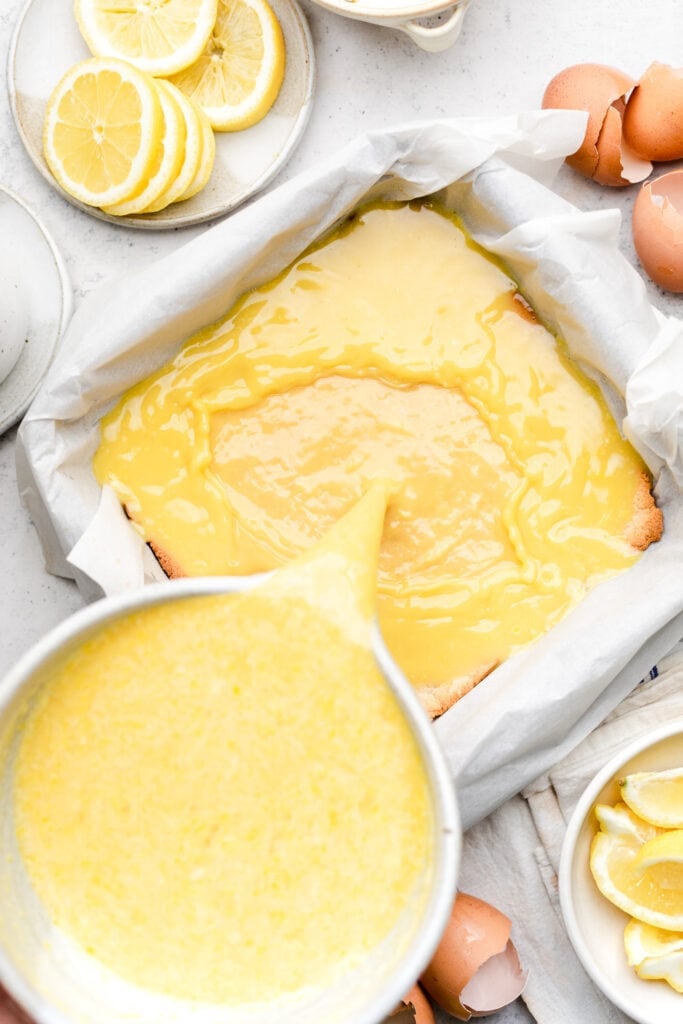
Step Three: While the crust is baking, you can make the lemon filling. To do this, add the lemon juice, eggs, maple syrup, lemon zest, and sifted tapioca starch to a large mixing bowl. Whisk all of the ingredients together until well combined.
Step Four: Once the crust is done baking, remove it from the oven and then turn down the oven temperature to 325 degrees. Immediately pour the lemon filling over the warm crust. Bake the bars for 20-25 minutes or until the filling is set. The edges should be completely set and the filling should no longer be runny.
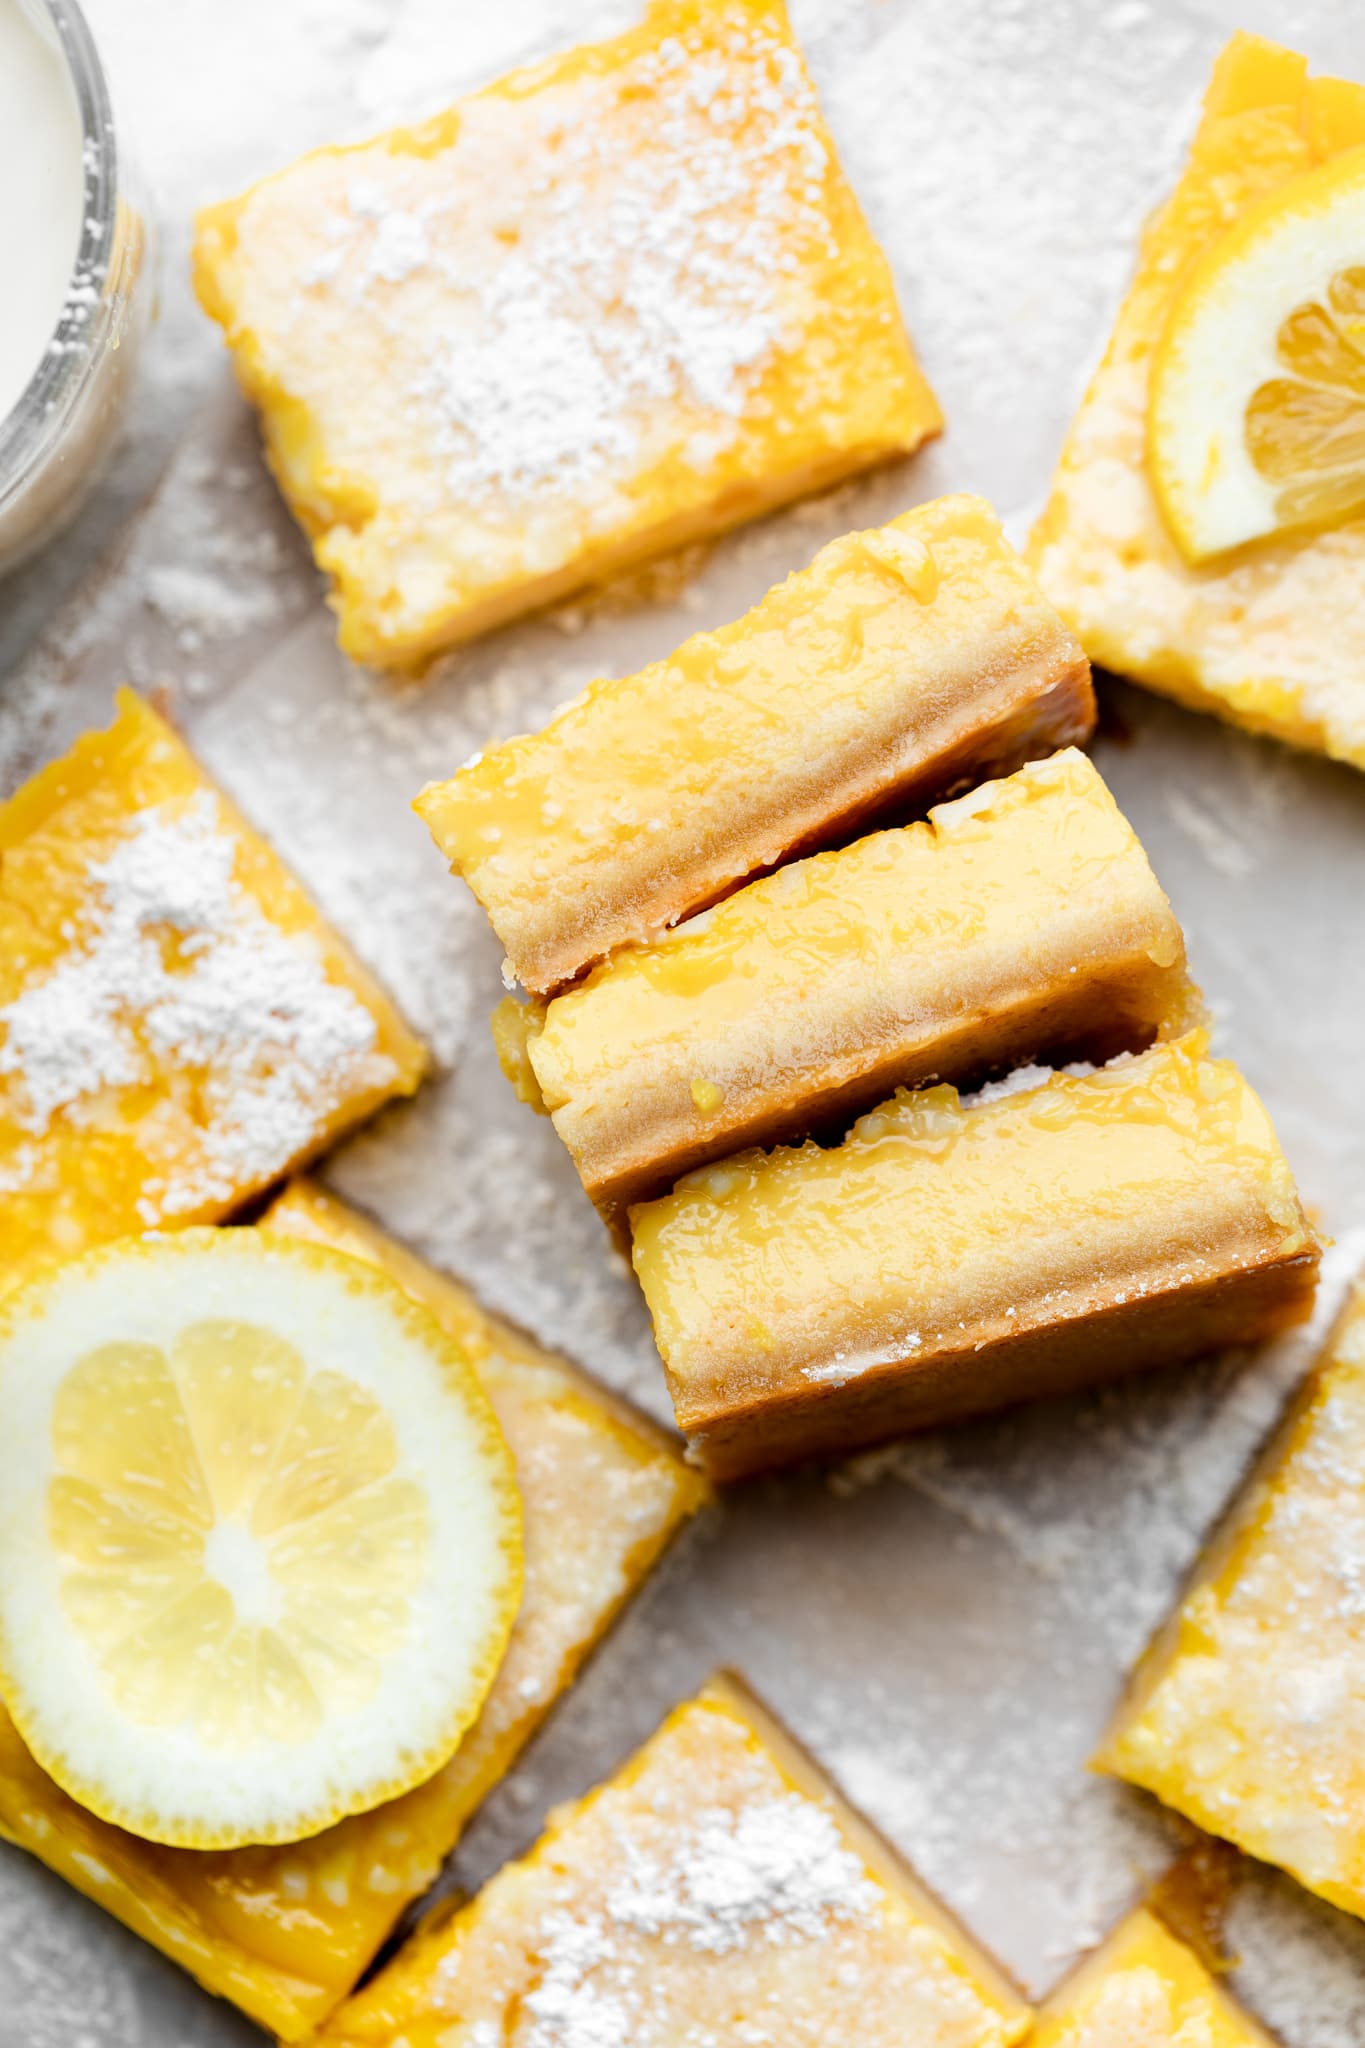
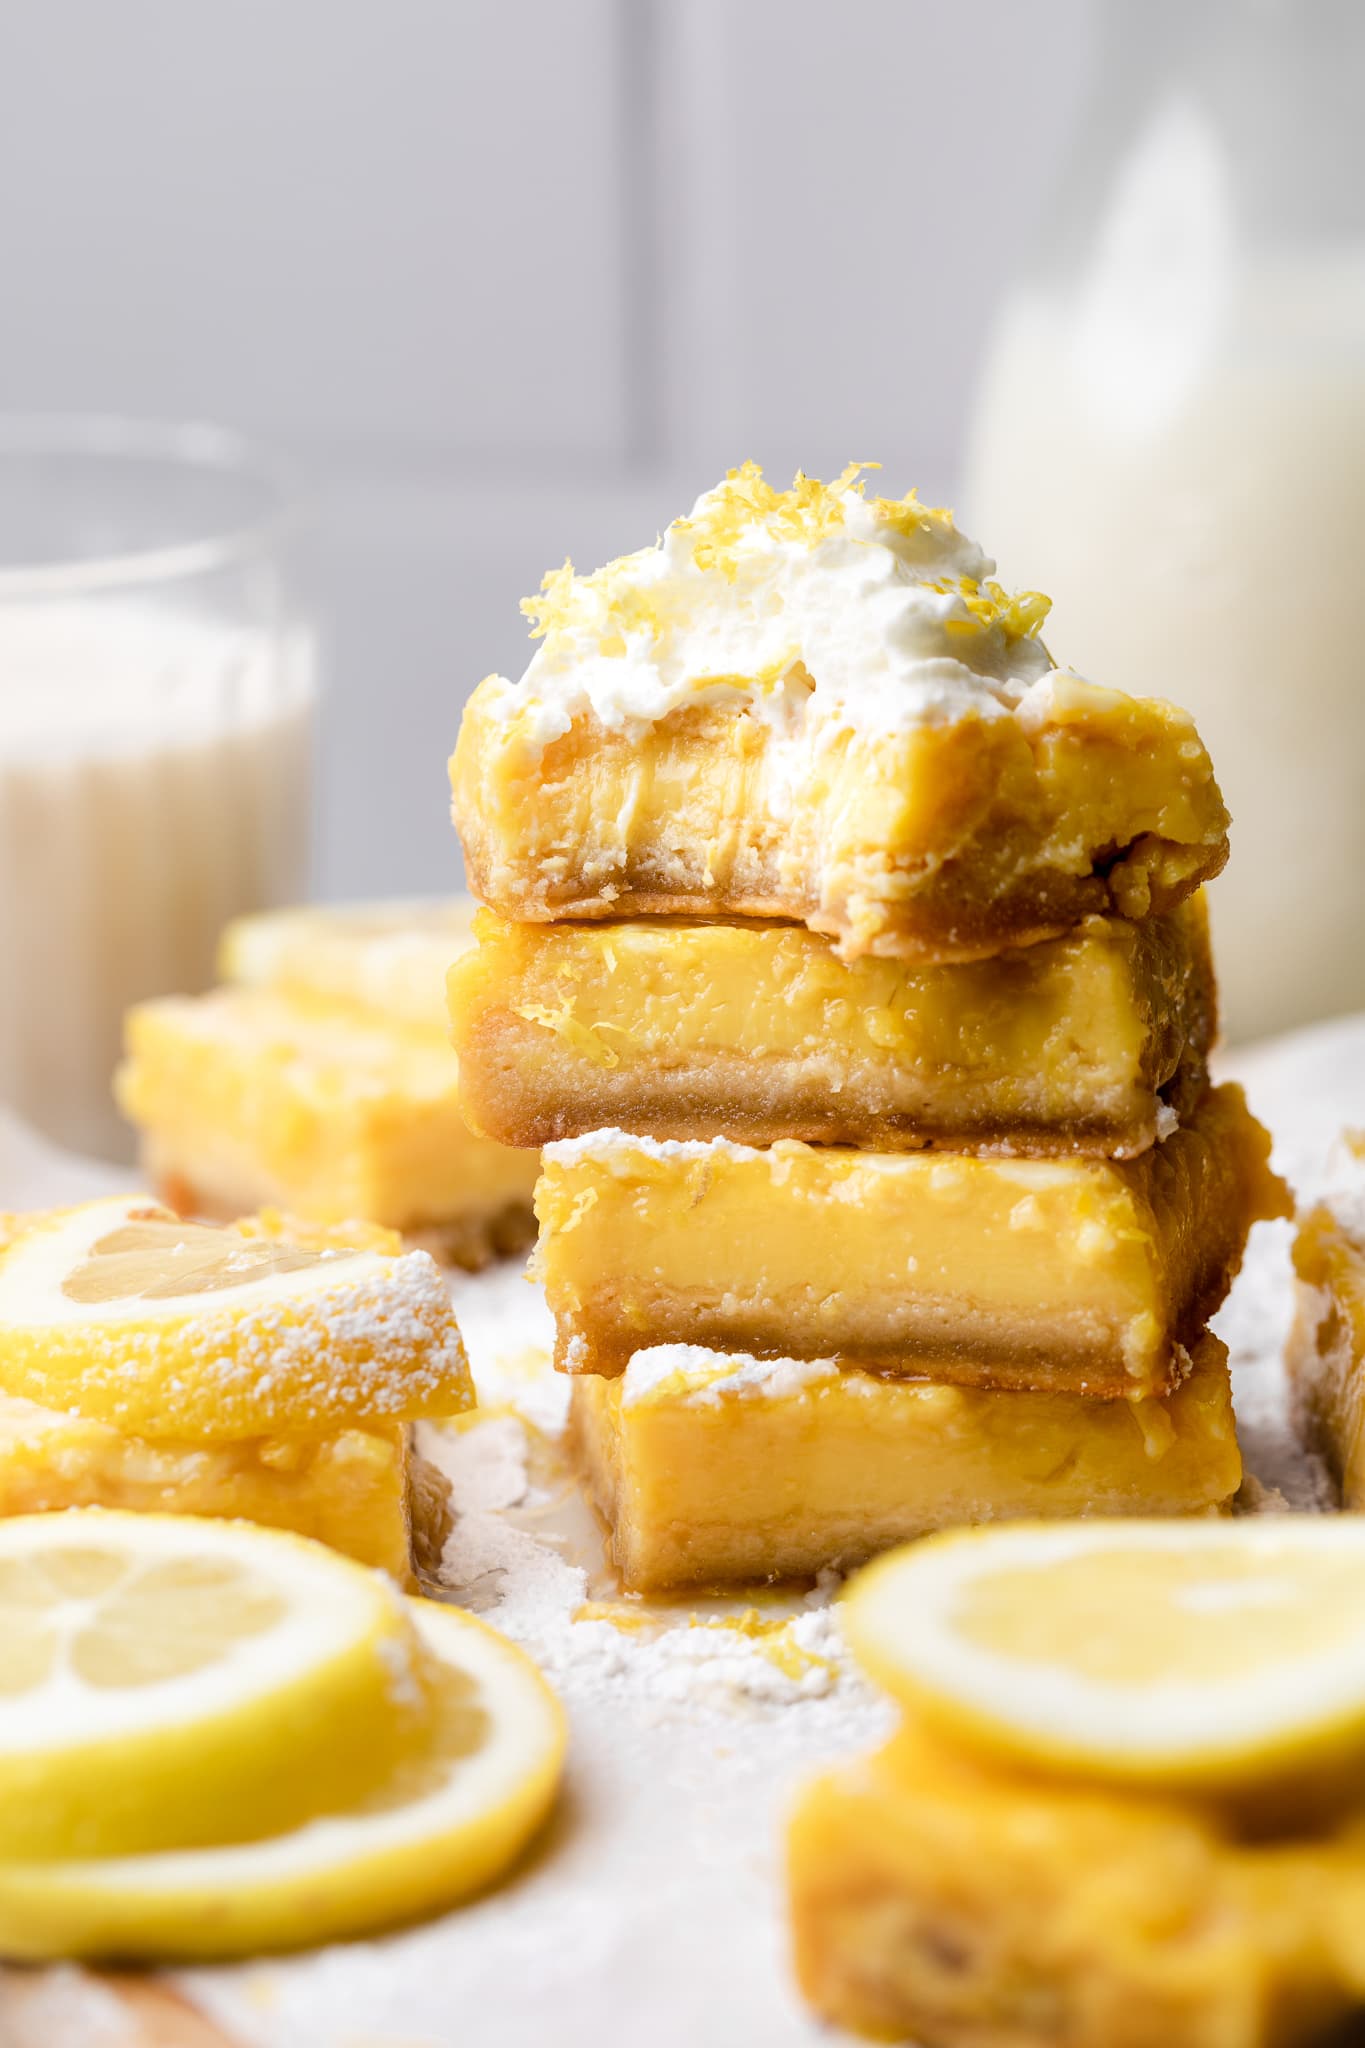
Step Five: Let the bars cool completely until they are room temperature. Once cooled, you can remove the bars from the pan and then place them in the fridge for an hour or two until chilled. Once the bars have chilled, you can remove them from the pan and dust them with powdered sugar. Use a sharp knife to slice the bars into nine or twelve squares.
Baking Tips
Use fresh lemon juice. The bottled shelf-stable stuff is not going to work for this recipe.
Pour the filling over a warm crust. This will ensure that the crust does not become soggy.
Use a food processor when making the crust. I tested using my hands to incorporate the butter and it did not work well. Using a food processor to cut the cold butter into the almond flour was much easier and yielded the best results.
Adjust the amount of lemon juice to your liking. If you do not like really tart lemon bars you can try using half a cup of lemon juice instead of three-fourths a cup.
Troubleshooting
What if my lemon bars crack?
It is common and completely normal if your lemon bars have a few little cracks. Just cover them with a dusting of powdered sugar.
Why are my lemon bars not setting?
A slight jiggle to your lemon bars after baking is fine. The edges should be completely set and the filling should no longer be runny. The bars will continue to set as they cool.
How to Store and Freeze
Storing: I recommend storing the lemon bars in the fridge unless you plan to eat them all in one day. You can serve the bars at room temperature but store them in an air-tight container in the fridge to keep them fresh.
Freezing: You can freeze your lemon bars for up to three to four months. If you plan on freezing the bars, skip dusting powdered sugar on top and simply slice them into bars. Once sliced, place the bars on a sheet pan and freeze them individually until solid. You can then add the bars to a freezer safe storage bag or container. Individually wrapping them will help to prevent freezer burn from occurring. Once you are ready to eat a bar, remove it from the freezer and let it thaw in the fridge. Once thawed, sprinkle on a bit of powdered sugar and enjoy!
More Delicious Dessert Recipes
- Healthy Key Lime Pie Bars
- No Bake Strawberry Cheesecake Bars
- Blueberry Lemon Cheesecake Bars
- Strawberry Oatmeal Bars
I hope you give these Gluten Free Lemon Bars a try! They are so easy to make and have the best lemon flavor. If you do give this recipe a try, I want to know! Leave a comment with a star rating below. You can also snap a photo & tag @allthehealthythings / #allthehealthythings on INSTAGRAM. Your reviews help support All the Healthy Things and make it possible for me to continue to create the recipes you know and love.
Print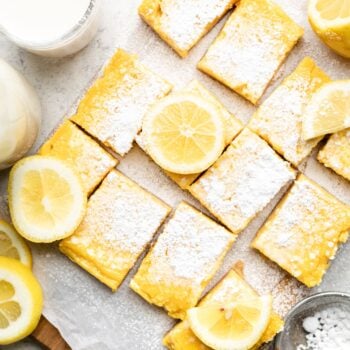
Gluten Free Lemon Bars
- Prep Time: 15 minutes
- Cook Time: 45 minutes
- Total Time: 1 hour
- Yield: 12 bars 1x
- Category: Desserts
- Method: Baking
- Cuisine: American
- Diet: Gluten Free
Description
The best Gluten Free Lemon Bars! These bars are a healthier version of the classic made with fresh tart lemon juice, lemon zest, and just the right touch of sweetness from pure maple syrup. The bright lemon filling sits on a delicious almond flour crust that is naturally gluten free and so easy to make. You won’t be able to get enough of these!
Ingredients
Crust
- 1 1/2 cups almond flour
- 1 tablespoon tapioca starch
- 1/4 cup maple syrup
- 3 tablespoons cold butter, diced
- zest of one lemon
- ¼ teaspoon sea salt
Lemon Filling
- 3/4 cup lemon juice
- 6 large eggs
- 1/2 cup maple syrup
- 1 teaspoon vanilla extract
- zest of one lemon
- 1 tablespoon tapioca starch, sifted
- powdered sugar, for serving
Instructions
- Preheat oven to 350 degrees
- Add the almond flour, tapioca starch, maple syrup, cold butter, lemon zest, and sea salt to a food processor. Process the ingredients until a ball of dough forms. You may have the scrape down the sides once to ensure that everything is well incorporated.
- Remove the dough from the food processor and press it evenly into an 8×8 pan that has been lined with parchment paper. Bake the crust at 350 degrees for 15-20 minutes until golden. Remove the crust from the oven and then turn down the oven temperature to 325 degrees.
- While the crust is baking, make the lemon filling. Add the lemon juice, eggs, maple syrup, lemon zest, and sifted tapioca starch to a mixing bowl. Whisk until well combined.
- Once the crust is done baking, immediately pour the lemon filling over the warm crust. Pouring the filling over a warm crust will ensure that the crust does not become soggy. Bake the bars for 20-25 minutes or until the filling is set. The edges should be set and the filling should no longer be runny.
- Let the bars cool completely until they are room temperature. Once cooled, you can remove the bars from the pan and then place them in the fridge for an hour or two until chilled. Once the bars have chilled, you can remove them from the pan and dust them with powdered sugar. Use a sharp knife to slice the bars into 9 or 12 squares.
Notes
- Use fresh lemon juice. For the best results use fresh-squeezed lemon juice for the bars.
- Pouring the filling over a warm crust. This will ensure that the crust does not become soggy.
- Use a food processor when making the crust. I tested using my hands to incorporate the butter and it did not work well. Using a food processor to cut the cold butter into the almond flour was much easier and yielded the best results.
- Adjust the amount of lemon juice to your liking. If you do not like really tart lemon bars you can try using 1/2 cup of lemon juice instead of 3/4 a cup.
Recipe by: Ashlea Carver / All the Healthy Things | Photography by: Casey Colodny / THE MINDFUL HAPA


These are so good! Pardon me while I eat the entire pan…
Can’t wait to try these sometime soon! Could I swap tapioca starch for cornstarch in the crust? Or would that not work the same?
Thanks!
Hi, Kelly! yes, you could!
These are PERFECT! Followed the recipe exactly as written.
Thank you for this easy GF recipe that even my gluten eating friends loved. They’re absolutely delicious.
Lovedddd the crust on these – couldn’t even tell they were gluten free! Definitely need to pour onto a warm crust, because it ended up being the perfect texture. These are the real deal!